How to Create a VPC on AWS Step-by-Step
In this guide, I’ll walk you through the step-by-step process for creating a Virtual Private Cloud (VPC) on Amazon Web Services (AWS). A VPC enables you to launch resources like EC2 instances, RDS databases, VPN, and more in a private network within the AWS cloud. Let’s get started!
Step 1: Sign in to AWS console
Open your web browser and go to the AWS Management Console (console.aws.amazon.com).
Sign in with your AWS account credentials.

Step 2: Navigate to VPC dashboard
Once you’re logged in, in the search bar search “VPC” and click on the VPC.
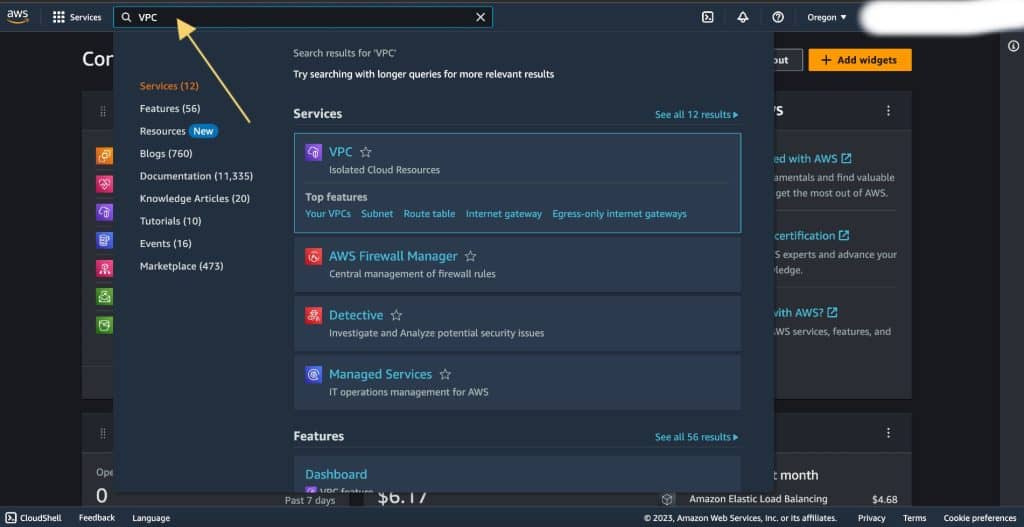
Step 3: Creating a VPC
First, choose the region that you want to create a VPC on.
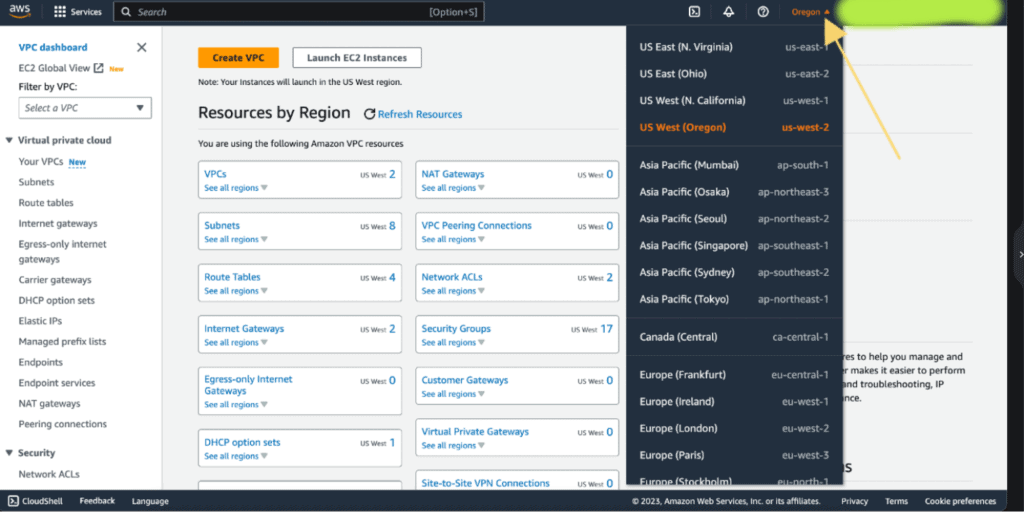
Then, In the VPC Dashboard, click on “Create VPC.”

Choose VPC only and provide a name for your VPC and specify the IPv4 CIDR block (e.g., 10.0.0.0/16). This block determines the IP address range for your VPC (If you want to know about the VPC CIDR block then go to this link). If you want to know more information about the options then you can click on info on the side.

Now click on “Create” to create your VPC.
We have successfully created the VPC. You will see the success message on the top.
Now we need to create a subnet. In AWS, a subnet is a segmented portion of a Virtual Private Cloud (VPC) that allows you to group and isolate resources within your private network.
Step 4: Configure subnets
In the VPC Dashboard, click on “Subnets.”
Click on “Create subnet.”

Choose the VPC you just created from the drop-down menu.
Assign a name for your subnet, choose the Availability Zone for your subnet, and specify the IPv4 CIDR block for the subnet (e.g., 10.0.1.0/24). The IPv4 CIDR block for a subnet is a range of IP addresses that determines the available addresses for instances and resources within that specific subnet in AWS.
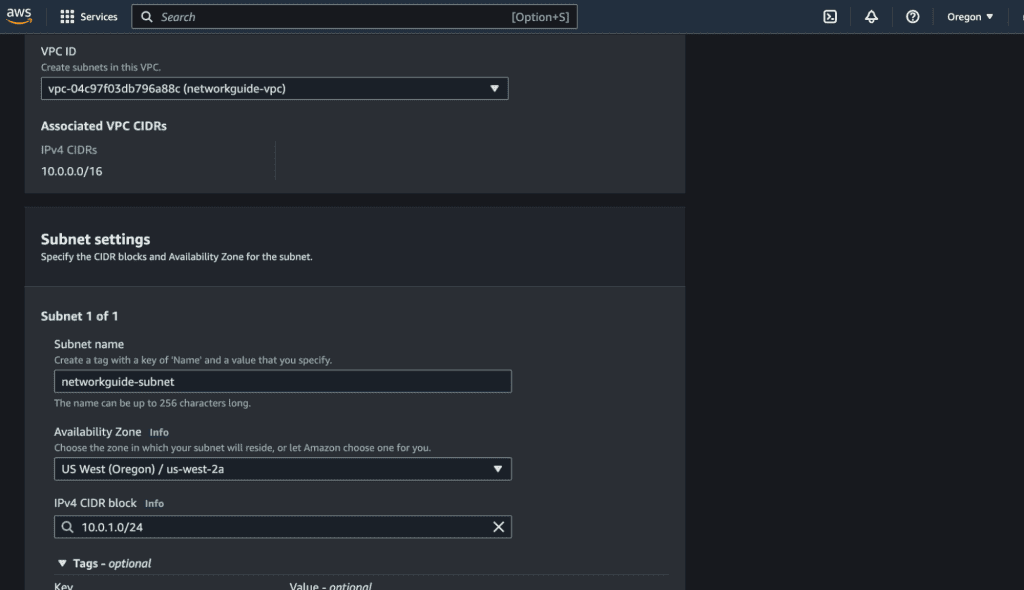
Then, click on “Create” to create the subnet. You will see the success message on top and also the subnet that you have just created with the status available.
Step 5: Set up internet gateway
An Internet Gateway in AWS VPC is a component that allows the instances within a public subnet to communicate with the internet and vice versa, allowing internet access for those instances.
In the VPC Dashboard, click on “Internet Gateways.”
Click on “Create Internet gateway.”

Give your internet gateway a name and click on “Create Internet Gateway.”

You will see the option at the top Attach to a VPC, click on that.
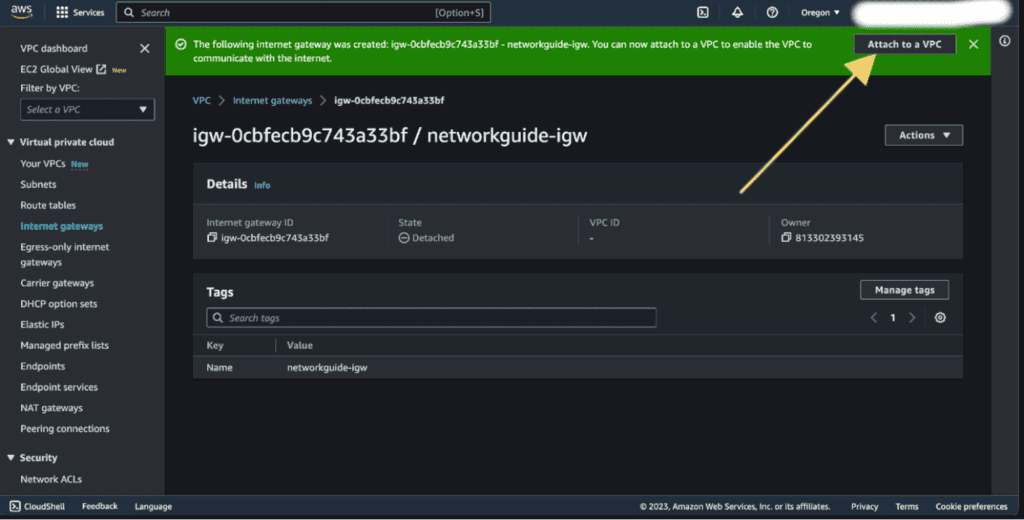
(If you don’t see the option attach to a VPC then you can click on Internet Gateways then can select the newly created Internet Gateway and click on “Actions” and choose “Attach to VPC.”)
Choose the VPC you created earlier and click on “Attach internet gateway.”
Step 6: Create a route table
A Route Table in AWS VPC is a set of rules that determine how network traffic is directed within the Virtual Private Cloud, guiding communication between instances and resources in different subnets. Route tables allow us to configure user-defined routing so that we can control the flow of packets across our network.
In the VPC Dashboard, click on “Route Tables.”
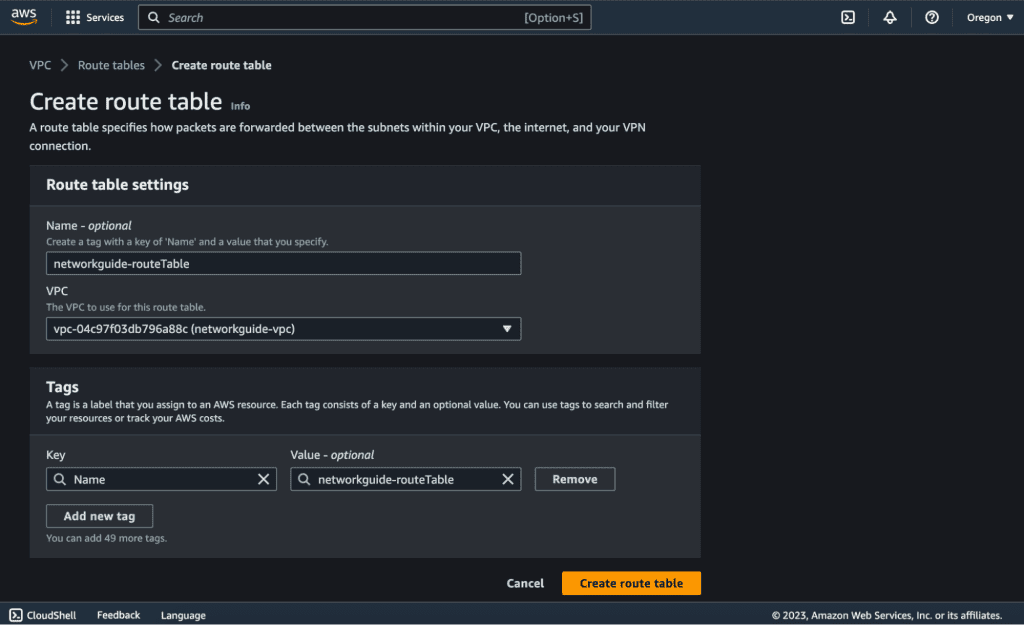
Click on “Create route table.”

Give your route table a name and select the VPC you created.
Click on “Create route table.”
You can see the success message that Route Table was created successfully on top. Now click on “Edit Routes” at the button right of the page.
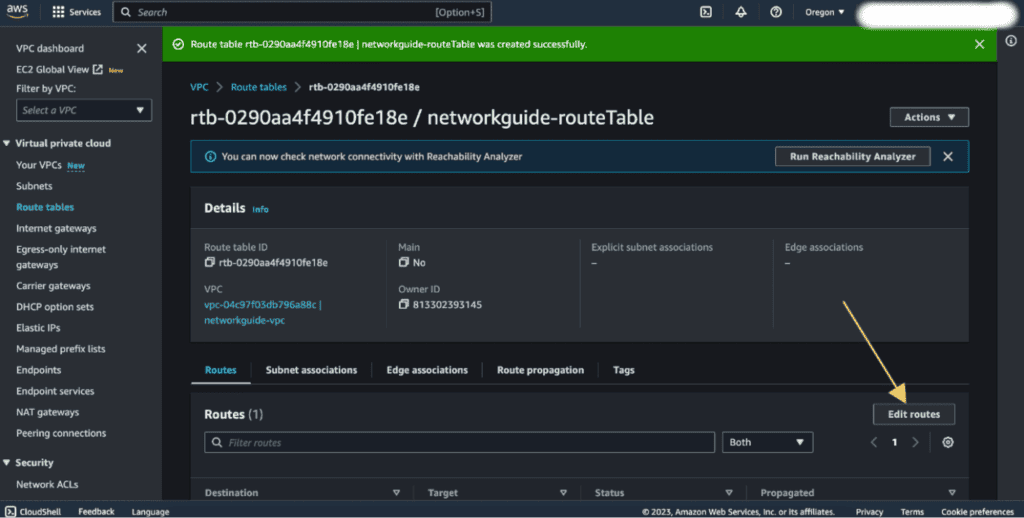
(If you can’t see that then you can click “Route Tables” from the left sidebar and select the new route table, click on “Routes” tab, and then click on “Edit routes.” )
Click on “Add route” then select (0.0.0.0/0) to enable internet access for instances in the subnet. And also select the Internet Gateway in the “Target” field and choose the Internet Gateway and it will show the internet gateway that we have created above. Select that.
Click on “Save changes.”

Step 7: Associate subnet with route table
We need to Associate Subnet with Route Table in AWS VPC to ensure that network traffic within the subnet follows the specified routing rules, allowing instances in that subnet to communicate with other resources in the VPC according to the desired configuration.
In the VPC Dashboard, click on “Subnets.”
Select the subnet you created earlier, click on “Actions,” and choose “Edit route table association.”

Select the route table you created in Step 6 and click on “Save.”

Step 8: Configure security groups
We need to configure Security Groups in AWS to control the inbound and outbound traffic for our instances, ensuring that only the allowed network traffic is allowed and enhancing the security of our resources in the Virtual Private Cloud.
In the VPC Dashboard/Sidebar, click on “Security Groups.” (It’s inside the Security tab)
Click on “Create security group.”

Provide a name and description for your security group.
Select the VPC you created earlier from the VPC dropdown.
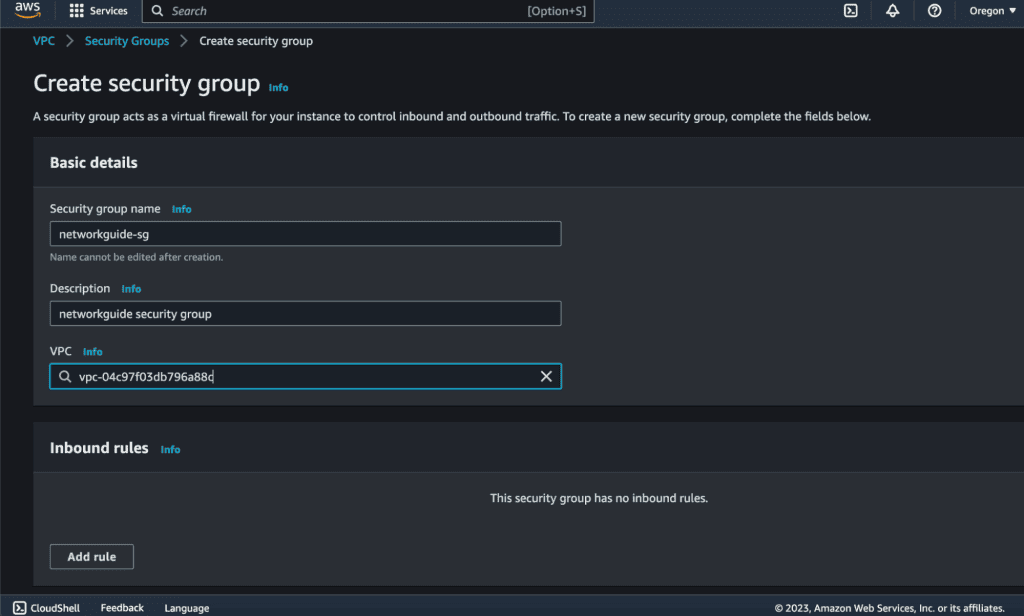
Configure inbound and outbound rules to control traffic to and from your instances. Inbound and Outbound rules are important for the VPC that you have created. For now, we will just allow HTTP requests in both the Inbound and Outbound rule. For more details about it, I have added a description with the example below.
Click on “Create security group.”
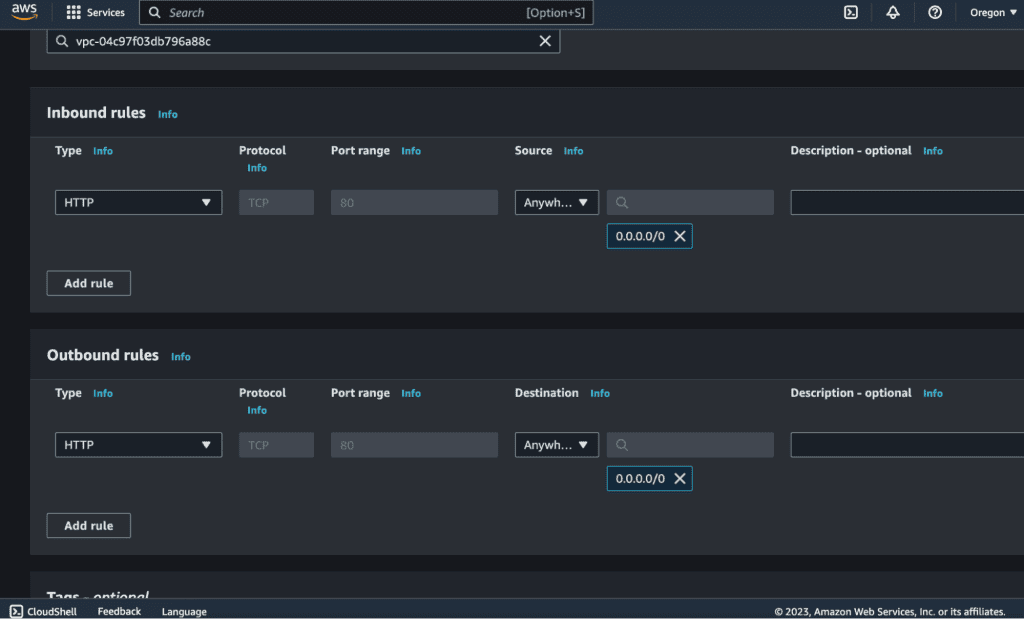
Inbound rules define what types of incoming traffic are allowed to reach an instance. These rules specify the source of the traffic, such as an IP address range or a security group, and the port or port range that is permitted.
Example: Let’s say you have a web server running on an EC2 instance in your VPC. To allow incoming HTTP (port 80) traffic, you would create an inbound rule that allows traffic from any IP address (0.0.0.0/0) to access port 80 on the instance. This allows anyone on the internet to access your web server.
Outbound rules control the types of outgoing traffic that are allowed to leave an instance. These rules specify the destination of the traffic, such as an IP address range or a security group, and the allowed port or port range.
Example: If you have a database server running on another EC2 instance in your VPC, you would create an outbound rule that allows traffic from the web server’s security group to access the database server’s port 3306 (MySQL). This rule ensures that the web server can communicate with the database server but restricts other instances in the VPC from accessing the database server.
If you want more information about inbound and outbound rules in AWS VPC Security Groups you can visit this link.
Congrats, you have successfully created a VPC on AWS, configured subnets, and set up internet access. If you want to launch Instances on your VPC then you can easily launch instances by selecting the above-created VPC and Subnets.
Now you have a secure and isolated environment to run your applications and services in the AWS cloud.
Next, you can play with using OpenVPN to connect to your VPC resources.


