Convert ASA 5516-X back to ASA from FTD
If you received a ASA 5500-X series firewall that is running FTD instead of ASA and you want to roll it back to ASA, (or you upgraded to FTD and decided it’s not for you and want to go back to the ASA OS) then you are in the right place.
We recently purchased a few Cisco ASA 5516-X firewalls for various things and all of them shipped to us with FTD on them, even though we specified ASA. I guess Cisco really wanted us to try out FTD. Where these are going, FTD isn’t something we need, so…. No.
Alright, lets look at what is required to get this baby back to good ol’ ASA software.
Requirements
You MUST have:
- A TFTP server accessible by your firewall.
- A console/serial/rollover cable
- Terminal software such as PuTTY
- The official ASA software from Cisco that you want to run on your firewall.
- The official ASDM software from Cisco that you want to manage your firewall with.
- The activation code for your firewall if you licensed any features above the 3DES/AES feature set (I’ll show you below how to retrieve your 3DES/AES license).
Let’s get started!
Steps to Convert ASA5500-X from FTD to ASA Image
- Connect the management port of your firewall to your workstation that is running the tftp software (or a switch that can access your tftp server).
- Connect your workstation to the console port of the firewall using a serial/rollover cable.
- Connect to your firewall using your terminal emulator software such as PuTTY.
- Login to the FTD appliance.
- If this is a new FTD install on a recent software version the default credentials should be:
- Username: admin
- Password: Admin123
- If this is a new FTD install on a recent software version the default credentials should be:
- Proceed through any EULAs and basic config wizard steps (if this is a new FTD install) and then reboot the ASA firewall using the ‘reboot’ command.
firepower login: admin Password: Last login: Tue Nov 3 17:17:52 UTC 2020 on ttyS1Copyright 2004-2019, Cisco and/or its affiliates. All rights reserved. Cisco is a registered trademark of Cisco Systems, Inc. All other trademarks are property of their respective owners. Cisco Fire Linux OS v6.5.0 (build 4) Cisco ASA5516-X Threat Defense v6.5.0 (build 115) > reboot This command will reboot the system. Continue? Please enter 'YES' or 'NO': YES
- As the ASA is booting back up, interrupt the boot process by pressing ‘break’ or ‘esc’ to drop into rommon.
Cisco Systems ROMMON, Version 1.1.15, RELEASE SOFTWARE Copyright (c) 1994-2019 by Cisco Systems, Inc. Compiled Sat 03/30/2019 7:00:46.51 by wchen64Current image running: Boot ROM0 Last reset cause: PowerCycleRequest DIMM Slot 0 : Present DIMM Slot 1 : PresentPlatform ASA5516 with 8192 Mbytes of main memory MAC Address: bc:5a:22:22:22:22 Use BREAK or ESC to interrupt boot. Use SPACE to begin boot immediately. {ESC} Boot interrupted. - Erase the onboard flash drive.
rommon 1 > erase disk0: erase: Erasing 7039 MBytes ..............
- Note: If you’re reverting a 5516-x, 5508-x, or 5506-x, you do not need to specify an interface at this step as it will use the management interface by default. If you’re re-imaging a different model, set the interface that is connected to your switch or tftp server.
rommon 2 > interface gigabitethernet0/1
- Set the address of your ASA so it can talk to your switch or tftp server.
rommon 2 > address 10.10.10.253
- Set the subnet mask.
rommon 3 > netmask 255.255.255.0
- Set the ip address of your tftp server.
rommon 4 > server 10.10.10.100
- Set the gateway of your ASA.
rommon 5 > gateway 10.10.10.1
- Set the name of ASA image file that is on your tftp server.
rommon 6 > file asa9-13-1-lfbff-k8.SPA
- Verify your network settings by running the ‘set’ command.
rommon 7 > set ADDRESS=10.10.10.253 NETMASK=255.255.255.0 GATEWAY=10.10.10.1 SERVER=10.10.10.100 IMAGE=asa9-13-1-lfbff-k8.SPA CONFIG= PS1="rommon ! > "
- Save your settings by entering the ‘sync’ command.
rommon 8 > sync
- Download and boot to the ASA image by running the ‘tftpdnld’ command.
rommon 9 > tftpdnld ADDRESS: 10.10.10.253 NETMASK: 255.255.255.0 GATEWAY: 10.10.10.1 SERVER: 10.10.10.100 IMAGE: asa9-13-1-lfbff-k8.SPA MACADDR: bc:5a:56:65:9a:89 VERBOSITY: Progress RETRY: 40 PKTTIMEOUT: 7200 BLKSIZE: 1460 CHECKSUM: Yes PORT: GbE/1 PHYMODE: Auto Detect Receiving asa9-13-1-lfbff-k8.SPA from 10.10.10.100!!!!!!!!!!!!!!!!!!!!!!!!!!!!!!!!!!!!!! File reception completed.
The ASA will now boot up to the image you specified but it will be running in volatile memory so we need to format the flash drive so we can save the permanent copy of the software and make room to save the running config to a startup config.
- Once booted up, the ASA will ask you if you wish to use the wizard to configure the management information of the firewall. Proceed if you wish, or skip if you want to set this up later.
Pre-configure Firewall now through interactive prompts [yes]? *return* Firewall Mode [Routed]: *return* Enable password [<use current password>]: Allow password recovery [yes]? *return* Clock (UTC): *return* Year [2020]: *return* Month [Dec]: *return* Day [11]: 11 Time [22:01:34]: 15:16:00 Management IP address: 10.10.10.253 Management network mask: 255.255.255.0 Host name: ciscoasa Domain name: npg.local IP address of host running Device Manager: 10.10.10.100 Use this configuration and save to flash? [yes] *return* INFO: Security level for "management" set to 0 by default. Cryptochecksum: 902d819c 60747c03 9855c56b 8d46eb12 3014 bytes copied in 0.70 secs Insufficient flash space available for this request: Size info: request: 41 free:0 delta:41 Insufficient flash space available for this request: Size info: request:32 free:0 delta:32 ERROR: Inspect configuration of this type exists, first remove that configuration and then add the new configuration User enable_1 logged in to ciscoasa Logins over the last 1 days: 1. Failed logins since the last login: 0. Type help or '?' for a list of available commands. ciscoasa>
- Enter ‘enable’ to enter enable mode.
ciscoasa> enable
- Format the disk using the ‘format disk0:’ command.
ciscoasa(config)# format disk0: Format operation may take a while. Continue? [confirm] *return* Format operation will destroy all data in "disk0:". Continue? [confirm] *return* Initializing partition - done! Creating FAT32 filesystem mkfs.fat 3.0.28 (2015-05-16) System tables written to disk Format of disk0 complete
- Assuming you configured the interface settings earlier, it’s time to TFTP the permanent copy of the OS to the flash drive.
ciscoasa# copy tftp disk0: Address or name of remote host? 10.10.10.100 Source filename? asa9-13-1-lfbff-k8.SPA Destination filename? asa9-13-1-lfbff-k8.SPA Accessing tftp://10.10.10.100/asa9-13-1-lfbff-k8.SPA...!!!!!!!!!!!!!!!!!!!!!!!!!!!!!!!! Verifying file disk0:/asa9-13-1-lfbff-k8.SPA... Writing file disk0:/asa9-13-1-lfbff-k8.SPA...107543456 bytes copied in 36.510 secs (2987318 bytes/sec)
- Set the copied OS as the boot image.
ciscoasa(config)# boot system disk0:/asa9-13-1-lfbff-k8.SPA
- Use TFTP to copy the ASDM software to the flash.
ciscoasa# copy tftp disk0: Address or name of remote host [10.10.10.100]? *return* Source filename [asa9-13-1-lfbff-k8.SPA]? asdm-7141-48.bin Destination filename [asdm-7141-48.bin]? *return* Accessing tftp://10.10.10.100/asdm-7141-48.bin...!!!!!!!!!!!!!!!!!!!!!!!!!!!!!!!!!!!!! Verifying file disk0:/asdm-7141-48.bin... Writing file disk0:/asdm-7141-48.bin...INFO: No digital signature found 35744052 bytes copied in 13.790 secs (2749542 bytes/sec)
- Set the copied ASDM image as the ASDM image:
ciscoasa# conf t ciscoasa(config)# asdm image disk0:/asdm-7141-48.bin
- Write the current running config to flash memory
ciscoasa# write memory
It’s at this point you would enter a license feature activation key if you had one saved (config t command ‘activation-key **key**’). I don’t have this so I will skip that. However, I do need to enable 3DES/AES using Cisco’s Free License to give me back the crypto features that come with the ASA5516-FPWR-K9 SKU. So let me step you through that process.
- Open a web browser and go to Cisco’s licensing portal at http://tools.cisco.com/SWIFT/LicensingUI/Quickstart
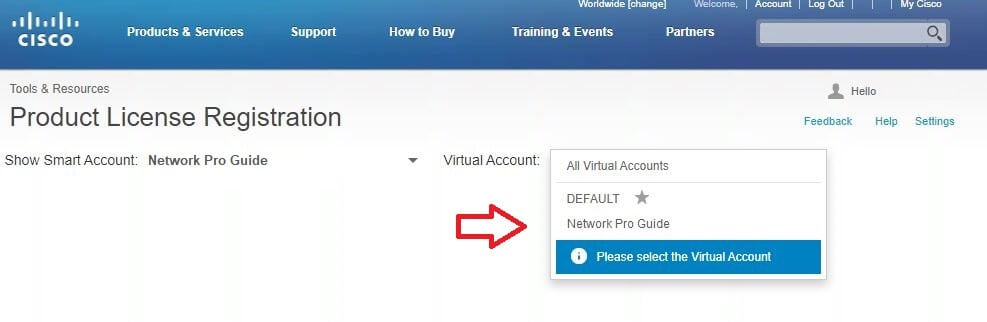
- Choose your Smart Account, if applicable

- Choose your Virtual Account, if applicable
- Navigate to Licenses -> Get Licenses -> IPS, Crypto, other…

- Click Next.
- Choose Security Products -> Cisco ASA 3DES/AES License

- Click Next.
- Enter the serial number of your ASA from the ‘show version‘ or ‘show module‘ commands.
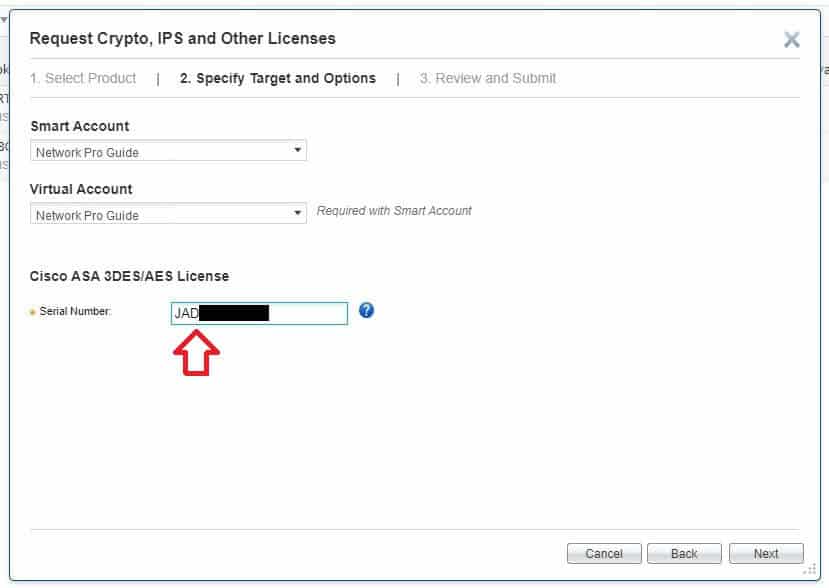
- Click Next.
- Verify your information and click Submit.
- Check your invox for an email containing the activation key.
- On your ASA run the ‘activation-key’ command via the CLI in config mode followed by the provided key.
ciscoasa(config)# activation-key 584hd835 496kgf03 34343678 8556kkr5 8214df45
- Run the command ‘show version‘ and verify the Encryption-3DES-AES now shows as Enabled.
Licensed features for this platform: Maximum Physical Interfaces : Unlimited perpetual Maximum VLANs : 150 perpetual Inside Hosts : Unlimited perpetual Failover : Active/Active perpetual Encryption-DES : Enabled perpetual Encryption-3DES-AES : Enabled perpetual Security Contexts : 2 perpetual Carrier : Disabled perpetual AnyConnect Premium Peers : 4 perpetual AnyConnect Essentials : Disabled perpetual Other VPN Peers : 300 perpetual Total VPN Peers : 300 perpetual AnyConnect for Mobile : Disabled perpetual AnyConnect for Cisco VPN Phone : Disabled perpetual Advanced Endpoint Assessment : Disabled perpetual Shared License : Disabled perpetual Total TLS Proxy Sessions : 1000 perpetual Botnet Traffic Filter : Disabled perpetual Cluster : Enabled perpetual Cluster Members : 2 perpetual VPN Load Balancing : Enabled perpetual


And that’s it! You should be back to good ol’ ASA now and can finally start setting it up.
