How to Configure User-Defined Routes in AWS
In Amazon Web Services (AWS), creating User-Defined Routes (UDRs) is a crucial networking task that allows you to customize the routing behavior for specific subnets within your Virtual Private Cloud (VPC). UDRs offer flexibility and control, enabling you to design a more efficient, secure, and scalable network environment. In this guide, I will walk you through the steps to create UDRs in AWS cloud and explain each step.
Each subnet is associated with a route table containing rules (routes) for directing traffic. By default, a VPC has a main route table, but custom route tables can be created for more specific control.
Related: How to Create/Modify NACLs and SGs in AWS
Configuring user defined routes (UDR) in AWS Step-by-Step
Step 1: Plan your network architecture
Consider traffic patterns, security needs, and performance requirements.
List the UDRs that you need for your application.
Step 2: Navigating to the AWS management console
Log in to your AWS account and access the AWS Management Console.
Type “VPC” on the search bar and click on VPC.
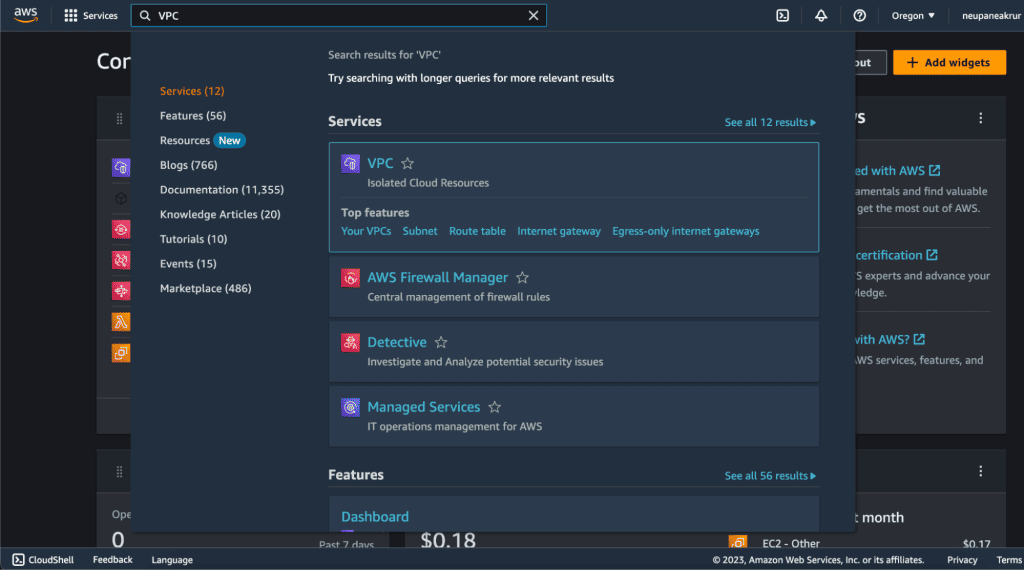
Step 3: Creating VPC and subnet
You need to have a VPC created and a Subnet to add the UDRs.
Here I have the “Test VPC” which is attached to an Internet Gateway.
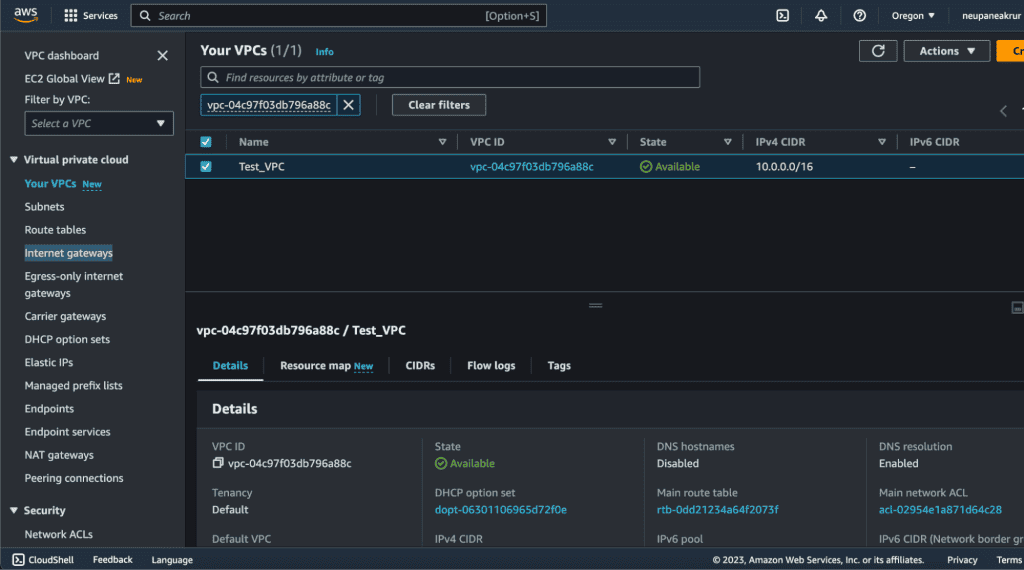
I also have created a subnet named “test-subnet” in which we will be adding the UDRs.
Step 4: Creating the route tables section
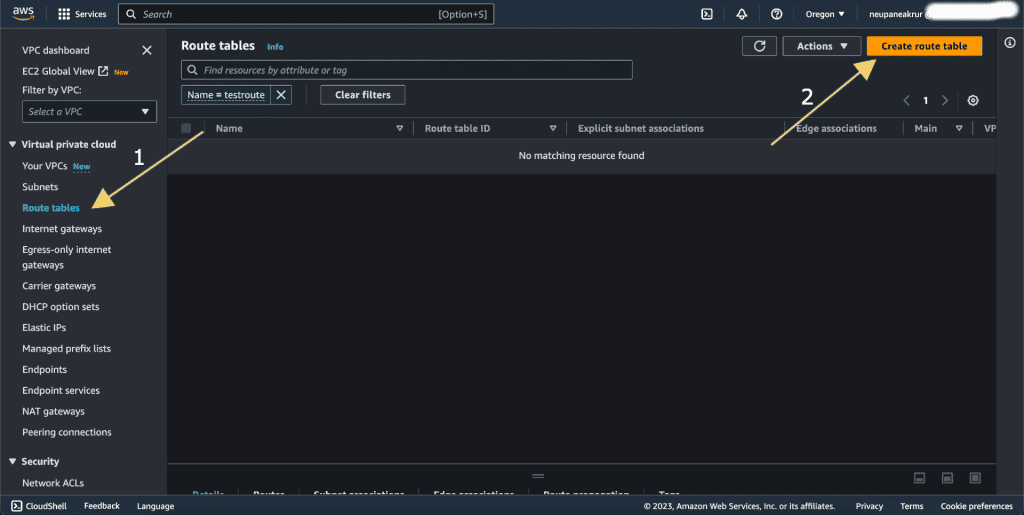
Click on “Route Tables” in the left-hand navigation pane.
Then click on “Create Route Table.”
Provide a name and select the VPC for the association.
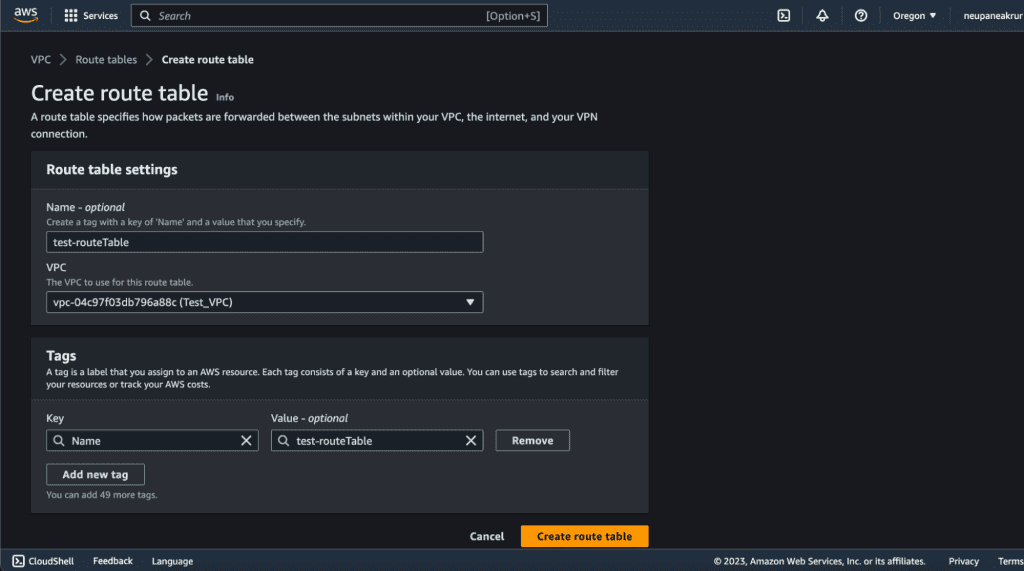
Then click on “Create route table.”
The route table will be created.
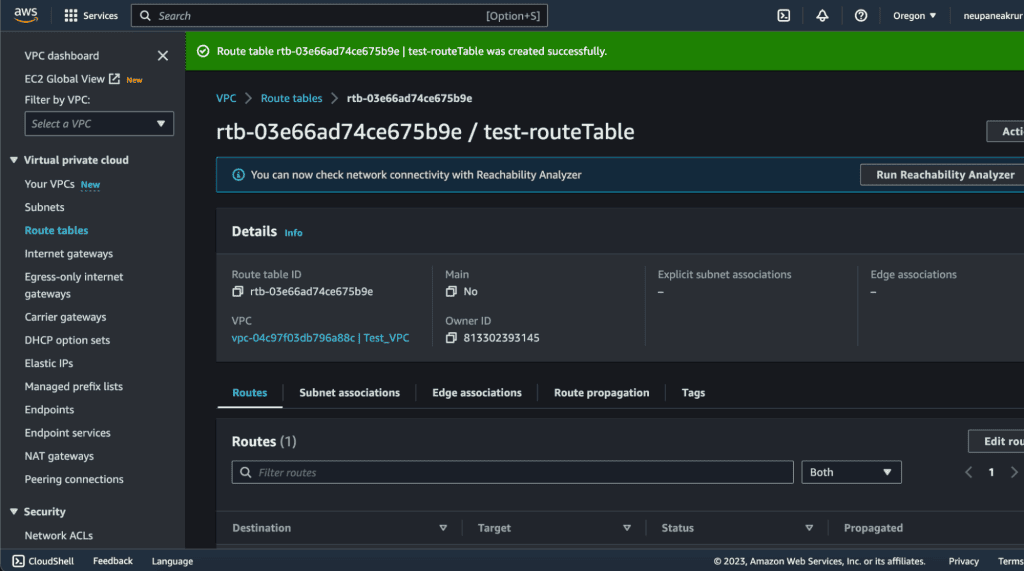
Step 5: Associating subnets with the UDR
Click on the “Subnet Associations” section.
Then click “Edit subnet associations.”

You will see the list of available subnets.
Select the subnets that require the UDR by ticking the checkboxes next to each subnet.
Click “Save associations” to associate the subnets with the route table.
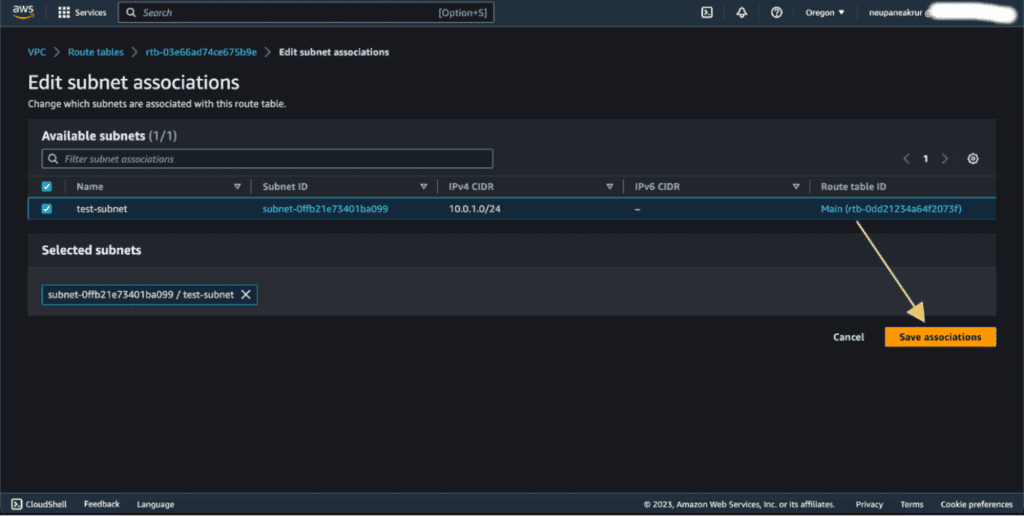
Step 6: Adding custom routes to the UDR
Go to the “Routes” section of the UDR details page and click “Edit routes.”
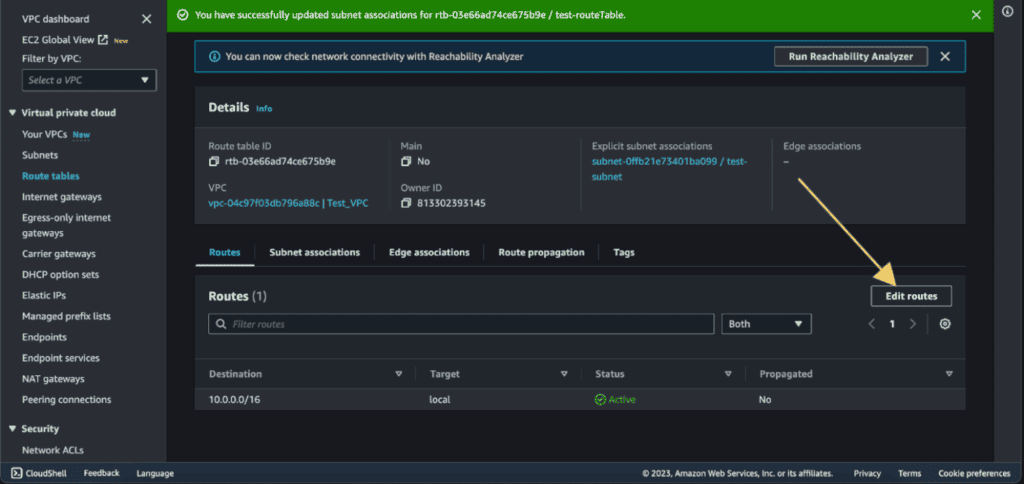
You will see the “Designation”, and “Target”.
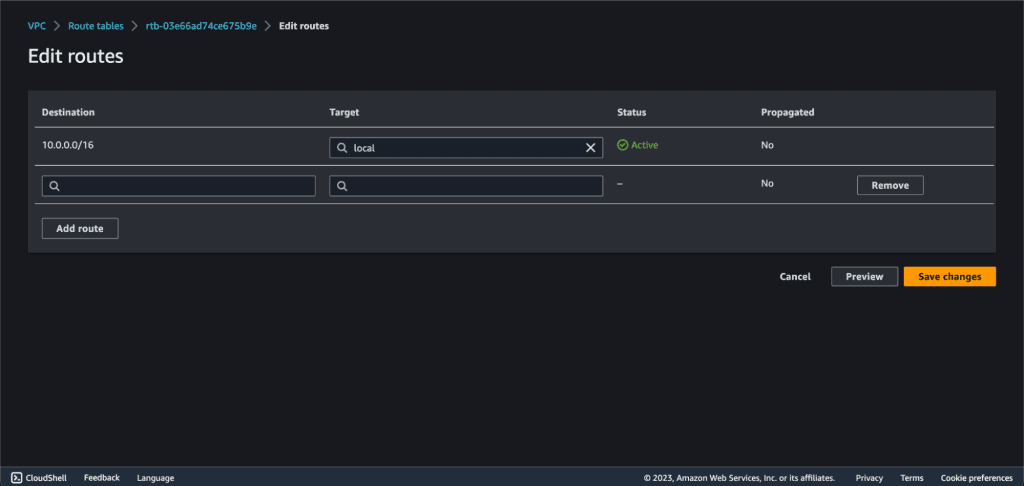
For this demo, we will be configuring a route to the internet:
Destination: 0.0.0.0/0 (all IPv4 addresses)
Target: Internet Gateway (IGW)
This route allows instances in the subnet associated with the route table to access the internet.
(If you want to know more about the different UDRs, Designations, and Targets. Scroll down to the last section of this tutorial.)
In the “Designation” type “0.0.0.0/0” and target as “Internet Gateway.” It will display the internet gateway attached to your VPC. Select that internet gateway.
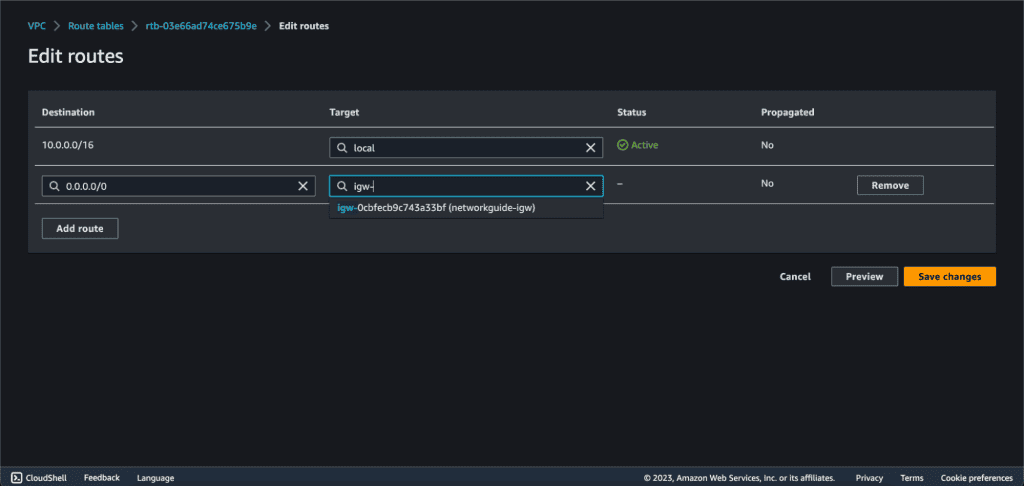
(If you don’t see the Internet gateway list after you have selected the “Internet Gateway” then you might not have attached the Internet gateway to your VPC.)
Then click on “Save Changes.”
Now your subnet has a connection to the internet through your own defined routes.
Step 7: Updating the UDRs
Now you might need to change the UDRs if your requirements change. Then you need to do the following steps:
Go to your route table.
Click on the “Edit Routes.”
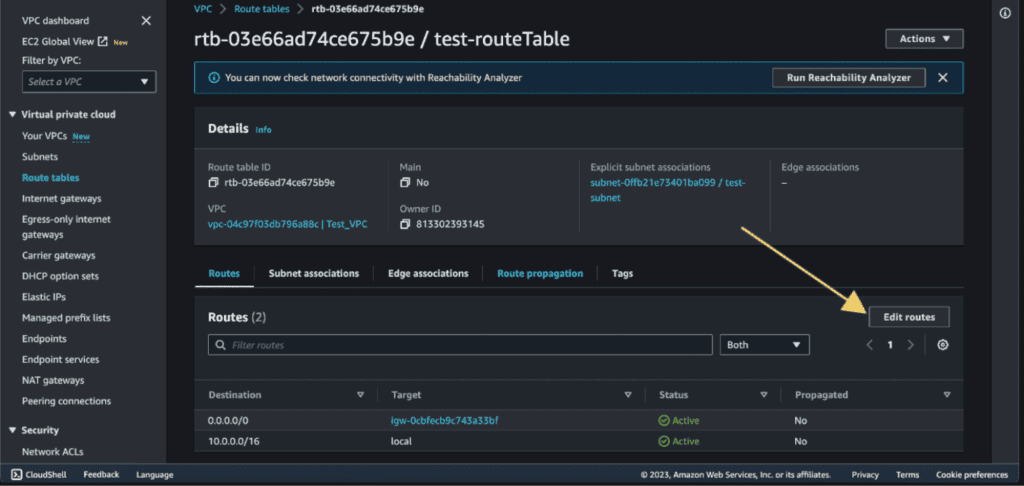
Click on “Remove” then “Save Changes.” It will remove the previously defined route.

You can add new routes according to your needs.
Important things to understand while creating UDRs
Destination: It is the destination CIDR block for which you’re defining the route. It specifies the range of IP addresses that the route applies to.
Target: The target determines where traffic destined for the specified destination CIDR block should be directed. It can be one of the following options:
- Internet Gateway (IGW): Routes traffic through an Internet Gateway, it allows instances in the associated subnet to access the internet.
- Virtual Private Gateway (VGW): Routes traffic to a Virtual Private Gateway, it is commonly used in VPN connections to on-premises networks.
- NAT Gateway: Routes traffic through a Network Address Translation (NAT) Gateway in a public subnet, it allows instances in private subnets to initiate outbound connections to the internet.
- VPC Peering Connection: Routes traffic to a VPC peering connection, it enables communication between VPCs.
- Network Interface (Instance or Elastic Network Interface): Routes traffic to a specific network interface. It is often used for routing through an instance acting as a router or firewall.
If you want any other UDRs then you can reference these things:
- Route to VPC Peering Connection:
- Destination: The CIDR block of the peer VPC
- Target: VPC Peering Connection ID
- This route enables communication between two VPCs that are peered.
- Route to NAT Gateway:
- Destination: 0.0.0.0/0 (all IPv4 addresses)
- Target: NAT Gateway ID
- This route allows instances in a private subnet to access the internet through a NAT Gateway for tasks like downloading updates.
- Route to Virtual Private Gateway (VPN):
- Destination: The on-premises network’s CIDR block
- Target: Virtual Private Gateway ID
- This route is used in VPN connections to route traffic between an AWS VPC and an on-premises network.
Use cases for setting up UDRs
Optimizing outbound traffic for specific workloads:
We can configure UDRs to direct outbound traffic from different application tiers through specific paths, such as Internet or NAT gateways. It will optimize performance and resource utilization.
Enforcing security policies with UDRs:
We can use UDRs to route traffic through network appliances or firewalls for inspection. It will ensure quality to security policies and compliance requirements.
Multi-region connectivity with transit gateway and UDRs:
We can use UDRs with AWS Transit Gateway to establish inter-region connectivity. It will allow multiple VPCs in different regions to communicate efficiently.
Hybrid cloud integration using UDRs:
We can create UDRs to enable controlled communication between on-premises data centers and AWS resources. It will facilitate hybrid cloud integration through VPN or Direct Connect connections.
Managing third-party services with UDRs:
We can utilize UDRs to route traffic to and from third-party services or partner networks, directing specific workloads through external services such as CDNs or analytics providers.
High-availability architectures with UDRs:
We can also design UDRs to establish high-availability architectures, directing traffic across redundant paths such as multiple Direct Connect connections or VPN tunnels for enhanced resilience.
Microservices communication patterns with UDRs:
We can configure UDRs to manage communication between microservices within a VPC. It will facilitate efficient traffic flow and load distribution between different service tiers.
Isolating development and production environments:
We can also use it to create separate UDRs for development and production subnets. It will ensure traffic isolation between environments to prevent unintended access or data leaks.


