Cisco ISE 2.4 Certificate Install
Certificates are an important part of a properly functioning Cisco ISE (Identity Services Engine) 2.4 install. Certificates aren’t just for getting rid of the https warning at the ISE admin login screen. Certs are also used for dot1x authentication, BYOD, pxGrid, adding and communicating with new ISE nodes, etc…
In my environment I’m going to an internal certificate authority within my active directory domain rather than a publicly signed certificate (like Godaddy, DigiCert, etc..)
Related: Configure New Cisco ISE 2.4 Install for Use as TACACS+ Server
Download and Install the Root CA in Cisco ISE 2.4
- Navigate to your Microsoft Active Directory Certificate Services web page (e.g. http//caserver/certsrv)
- Click Download a CA certificate.

- Select your current CA cert in the CA certificate box, select the Base 64 radio button, and then click the Download CA certificate link.

- Go back to ISE and navigate to Administration -> System -> Certificates -> Trusted Certificates and click Import.

- Choose the cert you downloaded above and type in a Friendly Name. Choose the appropriate Trusted For options:
Trust for authentication within ISE: Allows adding new ISE nodes provided they have the same Trusted CA cert imported into their Trusted Certificates store.Trust for client authentication and Syslog: Allows you to use the CA cert to authenticate endpoints using EAP and trust a secure Syslog server.Trust for authentication of Cisco Services: Allows CA cert to be trusted for external Cisco services such as a feed service.
- Click Submit.


Request, Download, and Install the System Certificate in Cisco ISE 2.4
With the CA cert added to the Trusted Certificates store we can issue a new Certificate Signing Request (CSR) and bind the certificate we receive our ISE node.
- Navigate to Administration -> System -> Certificates -> Certificate Signing Requests and click on Generate Certificate Signing Requests (CSR).

- Select Multi-Use, check the box next to your Node name, enter the appropriate Subject info, select DNS Name in the Subject Alternative Name (SAN) box and enter the fqdn of your ISE server, and click Generate. The SAN is case senstivie so if your ISE node is listed in all CAPS then make sure you type it that way in the SAN box (DNS Name) or you’ll receive an error on import.


- A box will open after the CSR is generated with an Export button. Click Export to download the CSR in .pem format.
- Open the .pem file you download in Notepad and copy the contents to your clipboard.
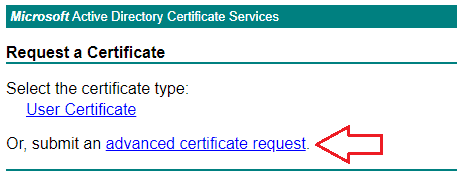
- Go back to your Microsoft AD CA Web Enrollemnt page and click Request a Certificate and then click advanced certificate request.

- Paste the contents of your CSR to the Base-64-encoded certificate request box.
- Select the appropriate Certificate Template. In my case it’s Web Server. If you plan to use pxGrid you can select Pxgrid.
- Click Submit.

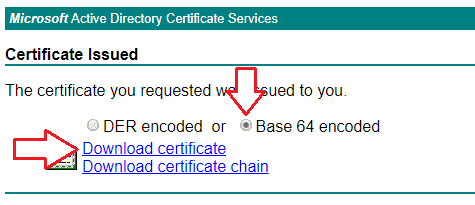
- Select the Base 64 encoded radio button and click Download certificate
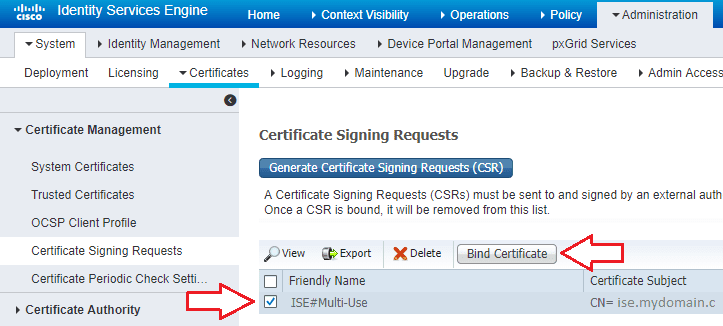
- Go back to ISE and navigate to Administration -> System -> Certificates -> Certificate Management -> Certificate Signing Requests and check the box next to the CSR you created earlier and click Bind Certificate.
- Choose the certificate you downloaded, enter a friendly name, and select the services you plan to use this cert for under Usage. I do not plan on using RADIUS or pxGrid and the Portal is for things like Guest, Sponsor, and Hotspot so I recommend using a publicly signed cert for those.


ISE will restart. Take a coffee break because it can take a few minutes for the web interface to come back up.
If you load the ISE webpage and still receive an HTTPS error (and you’re using Chrome) of:
You have recently allowed content loaded with certificate errors (such as scripts or iframes) to run on this site.
Then you just need to open the Chrome Developer tools, navigate to the application tab, and click Clear site data. Close and re-open the tab for ISE and you should now see a green Secure icon in front of your url.
- Click Submit. If you receive an error about the certificate chain missing from the Trusted Certificates store you need to make sure any subordinate or intermediate certificates are installed as well.

Hello,
Excellent post , congrats man…
I am having a problem with our certificate “Certificate path validation failed. Make sure required Certificate Chain is imported under Trusted Certificates.” … Have you already saw this message ?
Could you answer please ?
Thank you so much.
Make sure to export the certificate and re-import it to secondary nodes
If you have multiple ISE node, example ISE1, ISE2.mydoamin.com
Is this possible we can add all those node name in SAN and create one certificate for all ISE node?