Building a Multi-Tier Application with VPC and Load Balancing
In this article, I will walk you through creating a multi-tier application architecture with a Virtual Private Cloud (VPC) on AWS.
We’ll set up two private subnets for the application (Application Backend) and data tiers (Application Database) and a public subnet for the web tier (Application Frontend). We will focus on networking, ensuring the proper configuration of subnets, route tables, and security groups.
After that, you can quickly launch the resources on those subnets.
Our Application Architecture

We will have a minimum of 2 subnets for each tier. We will require 1 VPC, 2 public subnets, and 4 private subnets.
Step 1: Creating a Multi-Tier application Virtual Private Cloud (VPC)
The first thing you need to do is create a VPC. To do that:
Log in to your AWS Management Console.
Navigate to the VPC Dashboard.
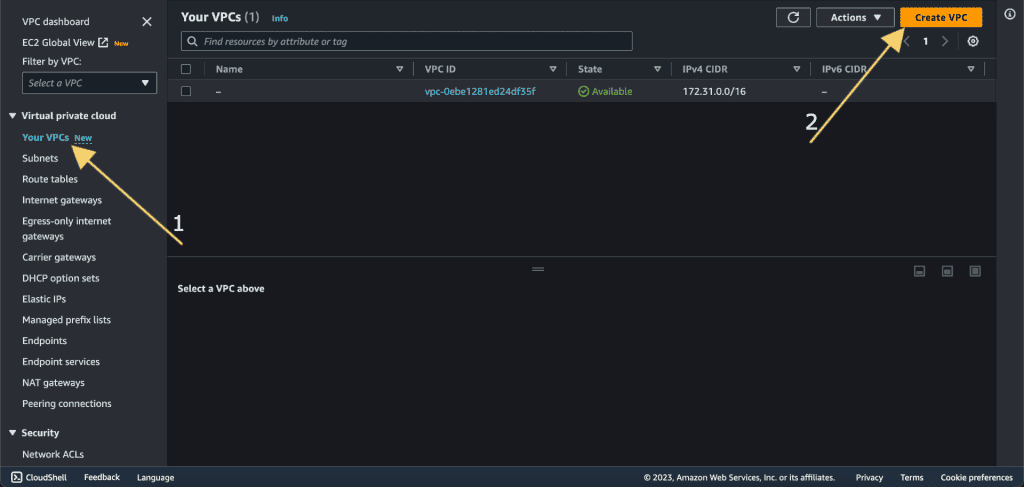
Click on “Your VPCs” in the left menu.
Click the “Create VPC” button.
Select “VPC and More.” (We are creating multiple az, subnet, and other features so we are selecting it.)
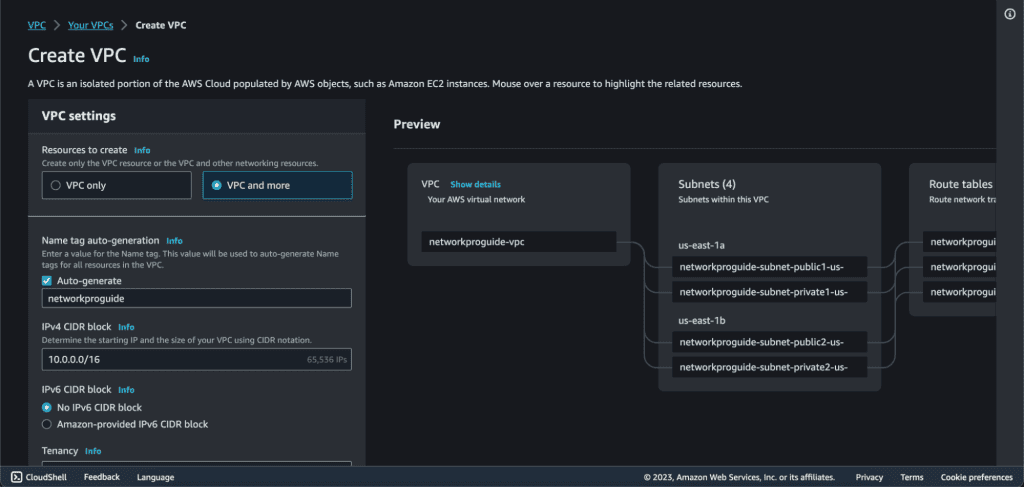
Give the name of the VPC.
Add “10.0.0.0/16” in the CIDR block field. (We will have multiple IP addresses in this CIDR.)
Select “No IPv6 CIDR block” as we will just be using IPv4.
Select tenancy as Default.

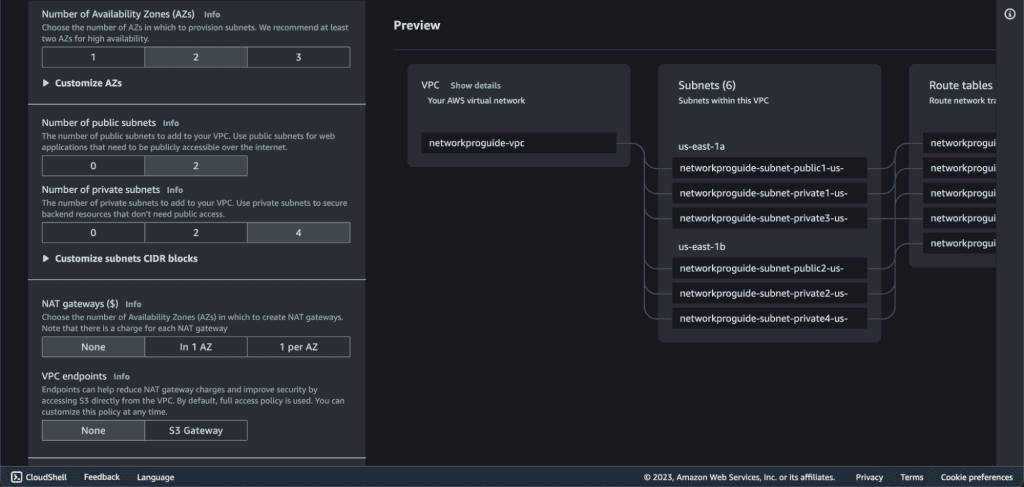
Choose several Availability Zones to “2.” ( We will have our subnet across two AZs.)
Choose the number of public subnets to “2.”
Choose the number of private subnets to “4.”
Choose NAT Gateway as “None.” ( We will not be attaching NAT gateway in our private subnet. If you want to attach it then you can do it.)
Choose VPC endpoints as “None.”
Enable DNS hostnames and DNS resolutions.
If you want to know about these selected features, you can click on “info” to get more information.
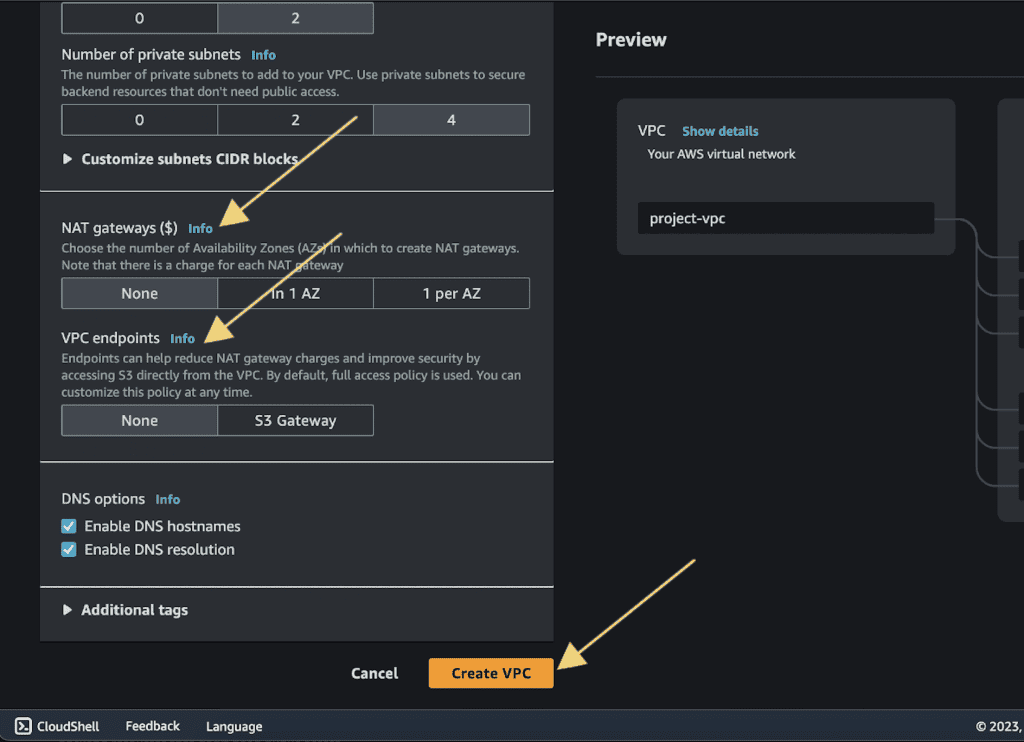
Click on “Create VPC.”
It will automatically create the VPC, Subnet, Route Tables, etc.

You can view the VPC and Subnets.
Step 2: Assigning public IPv4 to the public subnet
Go to the subnets section.

Select one of the public subnets from the list.
Click on the “Actions” button located at the top right corner of the page.
From the dropdown menu, choose “Edit subnet settings.”

Select “Enable auto-assign public IPV4 address”, then click “Save.”

Click on “Save.”
Select the second public subnet and repeat the same process.

Step 3: Launching EC2 instance (creating Web Tier)
Navigate to the EC2 Dashboard.
Click on the “Launch Instance” button.
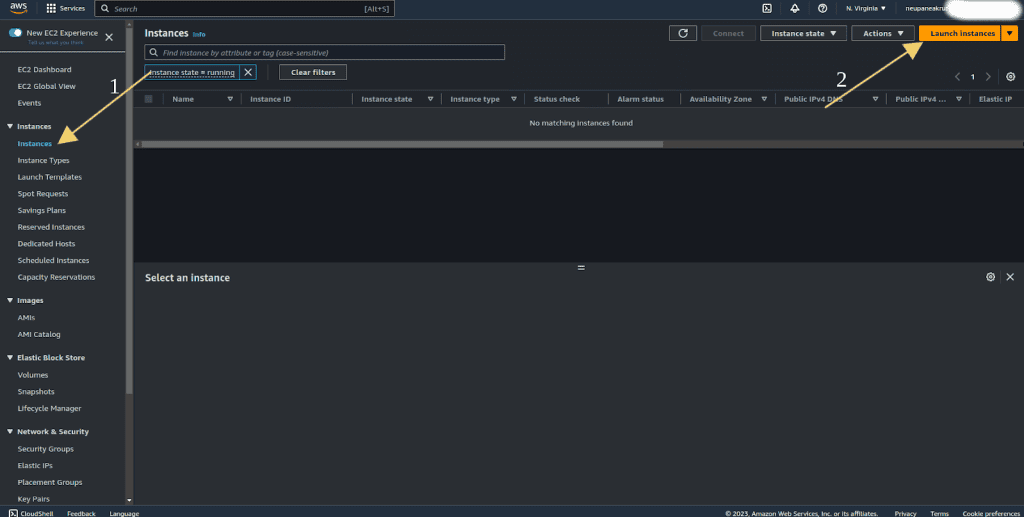
Choose an Amazon Machine Image (AMI) – e.g., Ubuntu 22.04.
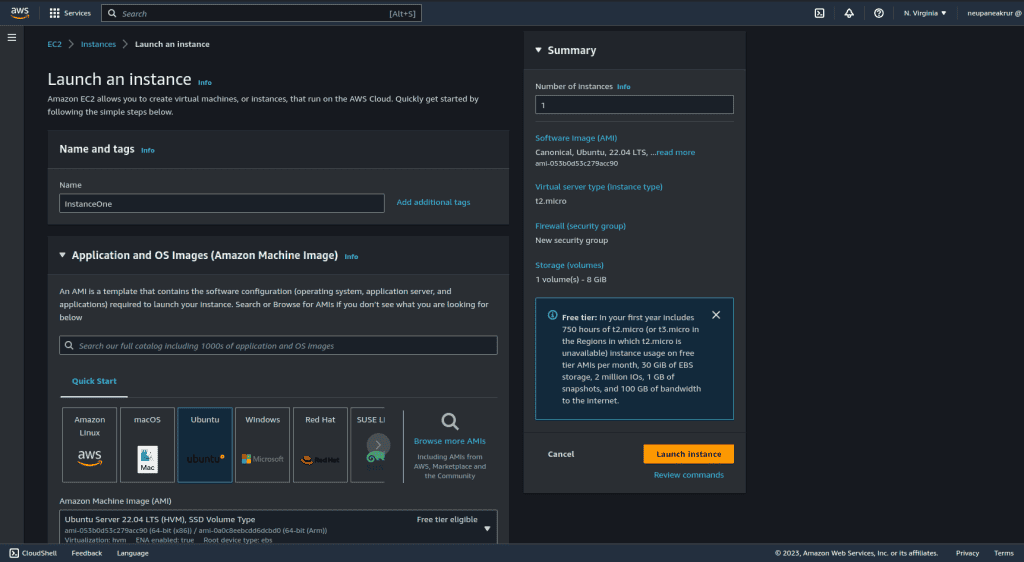
Choose an instance type, and select/create Key pair.
Click on “Edit” on the network settings tab.

Select the VPC that we have created above.
Choose the first public subnet that we have created and enable Auto-assign public IP.
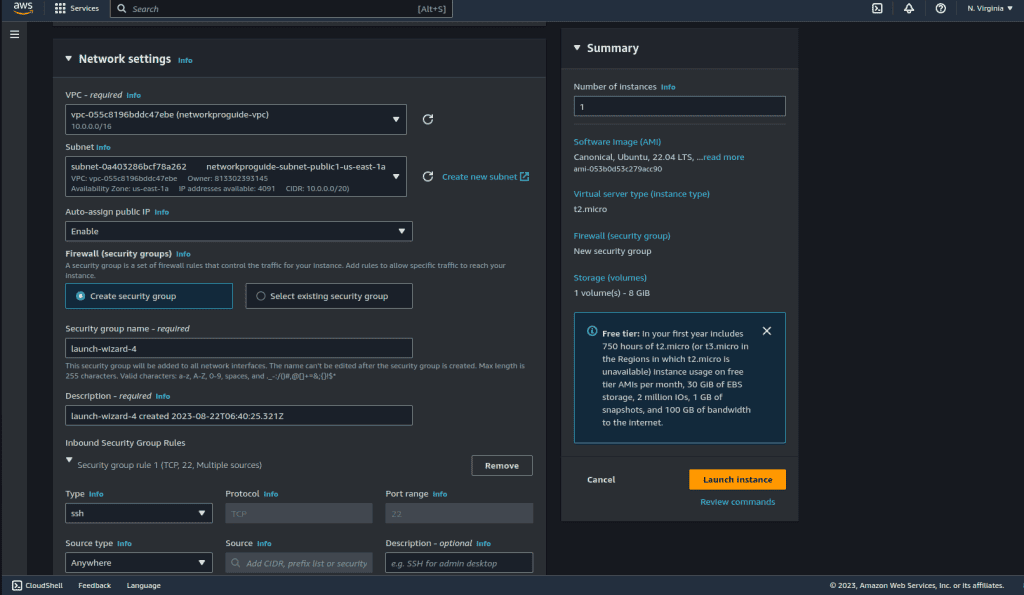
In the Firewall section, choose “Create security group.” In type select “HTTP”, and in source type select “Anywhere.” (You can also add/change it later by selecting the security group after the instance is created.
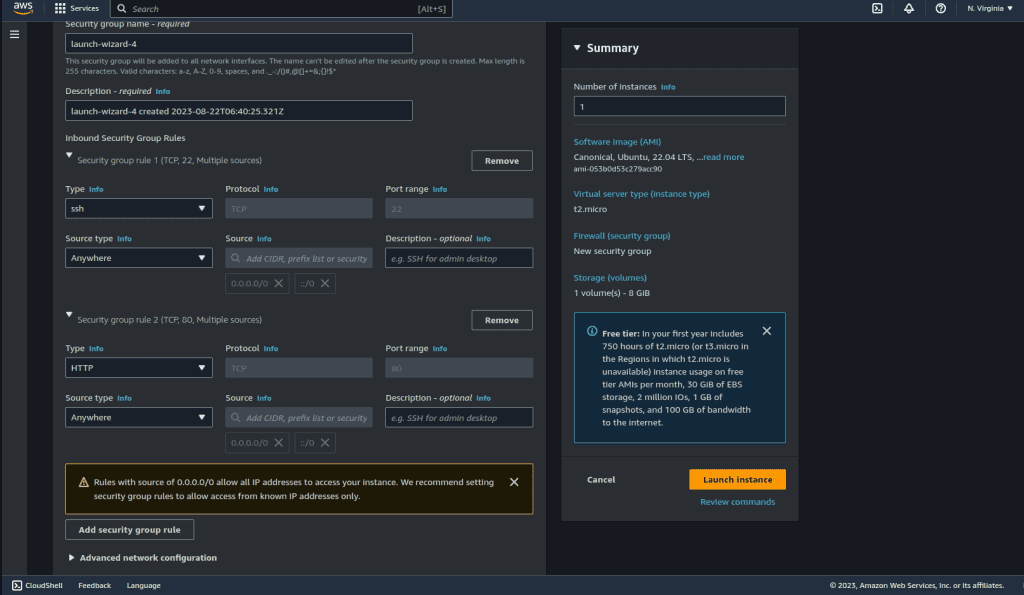
Click on “Advance Details” and scroll down to last.
In the “User data” section, add the following user data script in the field:
#!/bin/bash
apt update
apt install -y apache2
systemctl start apache2
systemctl enable apache2
echo "Hello world from $(hostname -f)" > /var/www/html/index.html
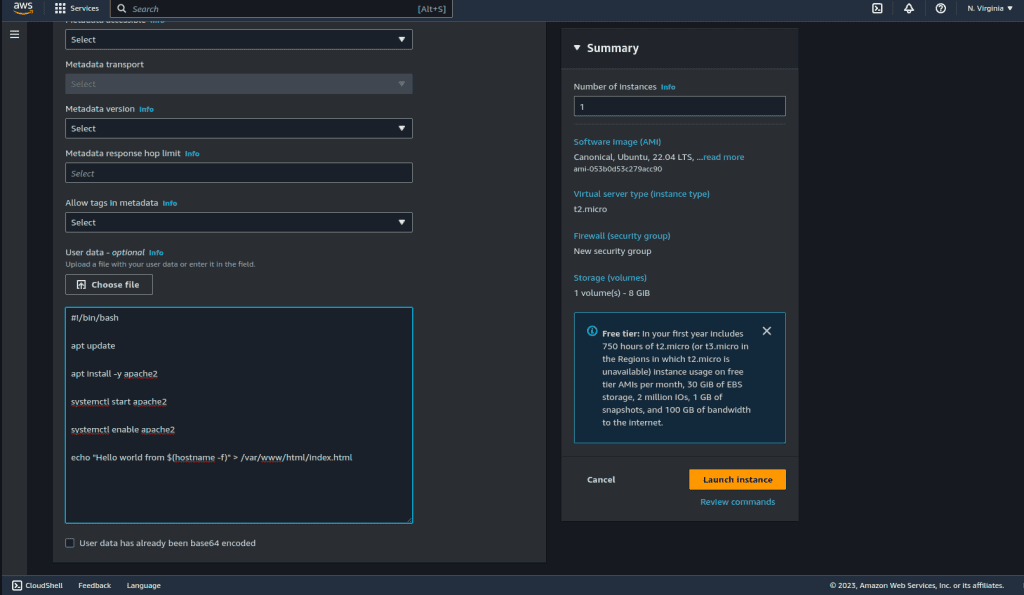
Now, Launch the instance.
Check the instance by its IP address.

Now for launching the second instance, go to the instance list.
Select that previous instance, click on “Actions” then select “Image and Templates” and click on “Launch more like this.”
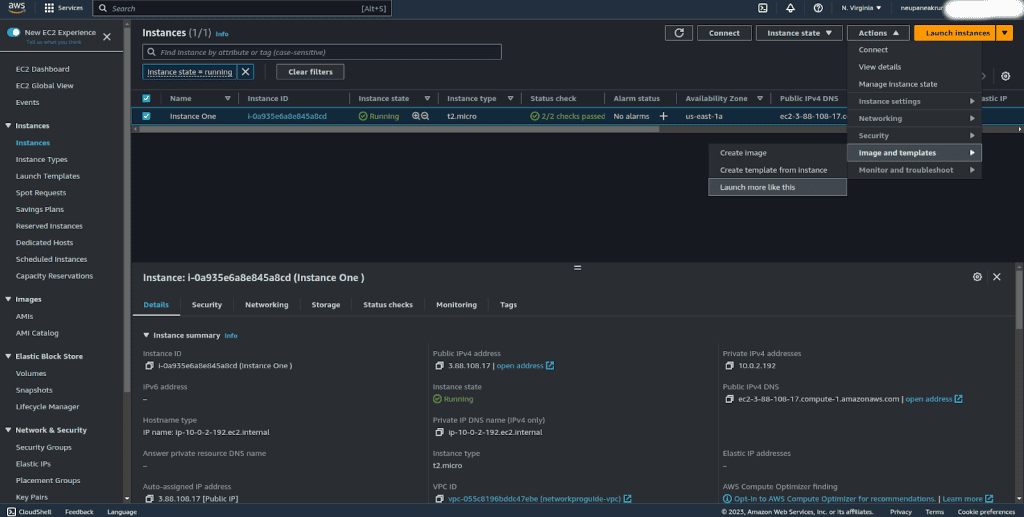
Give the name for the instance, and leave the AMI as the default.
Choose another subnet, a different one from the previous subnet.
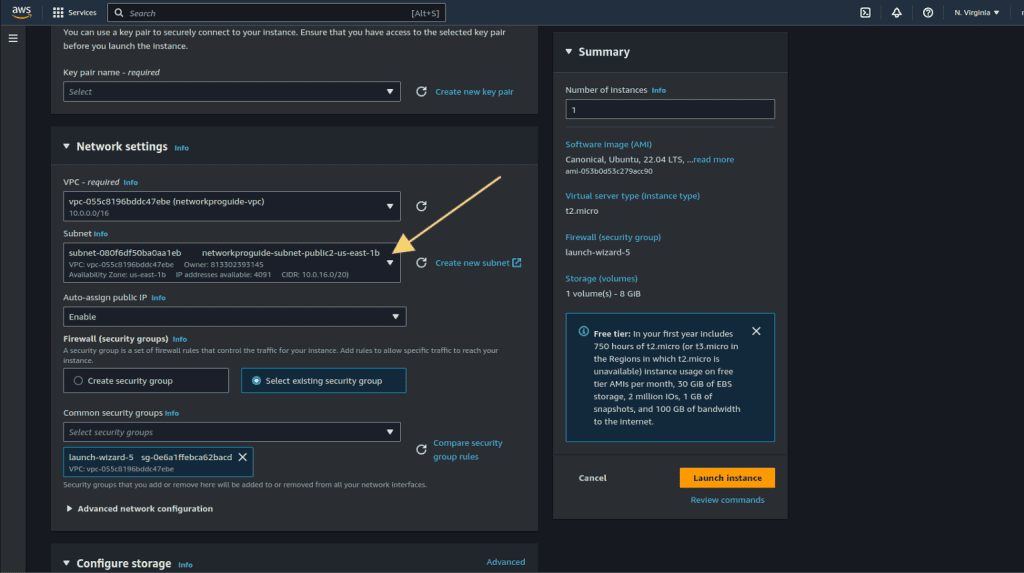
Leave other settings as it is and then click on “Launch instance.”
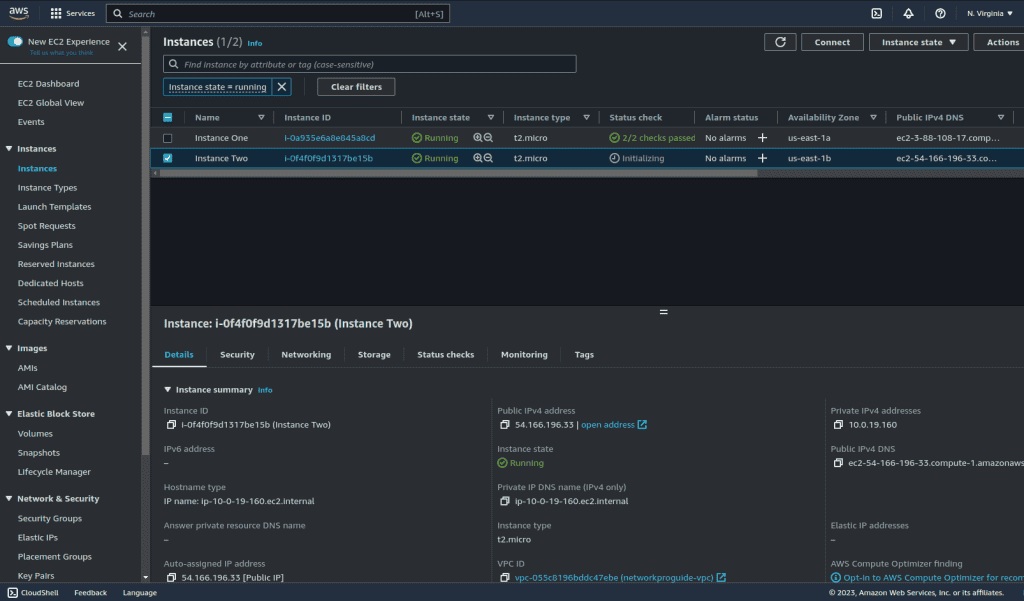
Wait for it to update its status to running and status check passed.
Here are our two different instances running on different AZ.
Step 4: Creating an Application Load Balancer
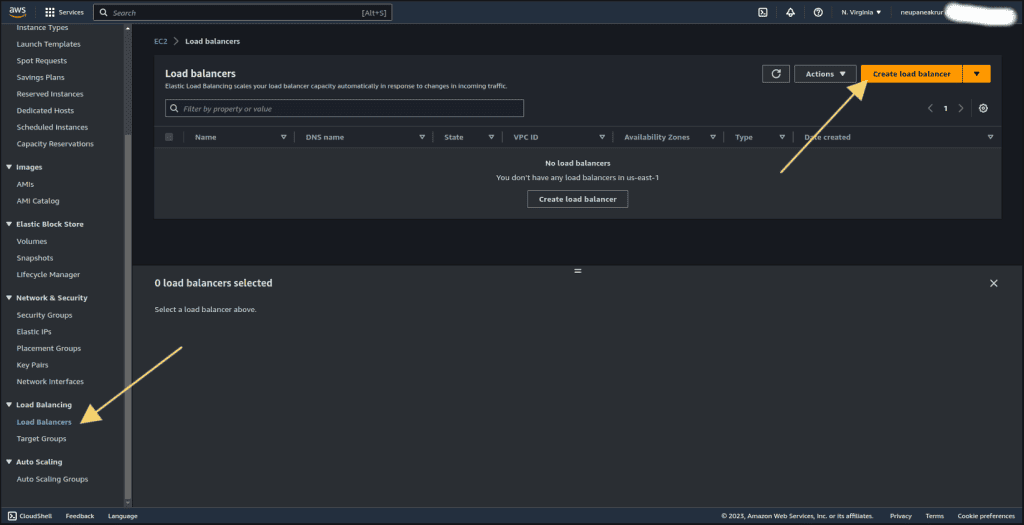
Click on “Load Balancers” from the left sidebar, then click on “Create load balancer.”
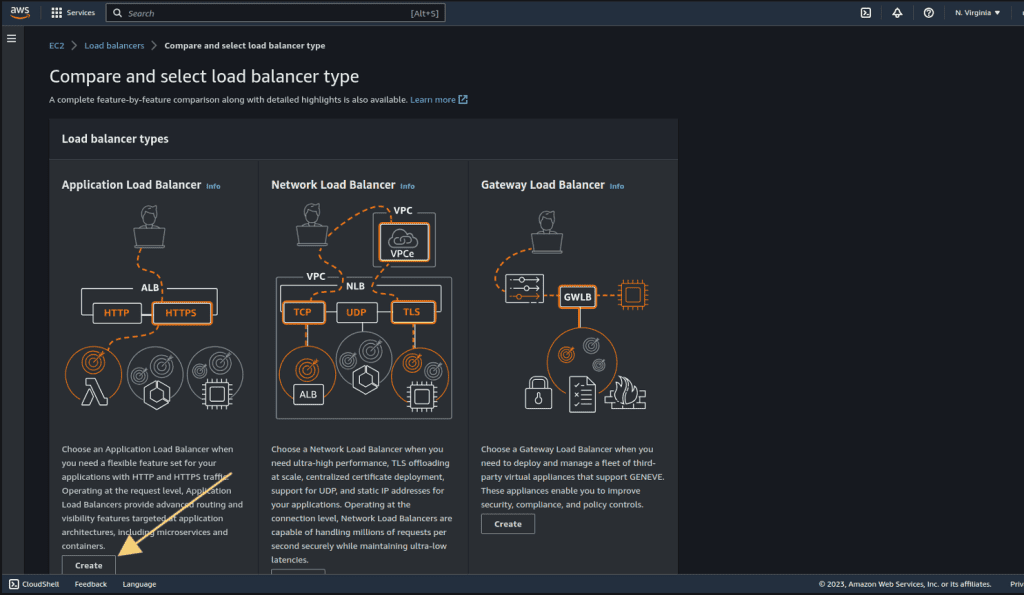
Click on “Create” on Application Load Balancer.
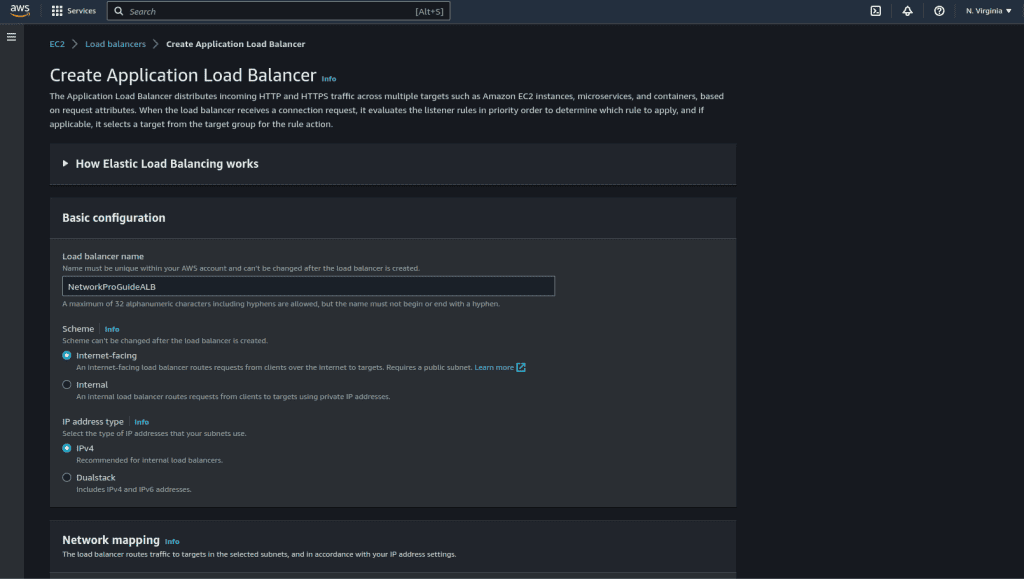
Give the name for the ALB.
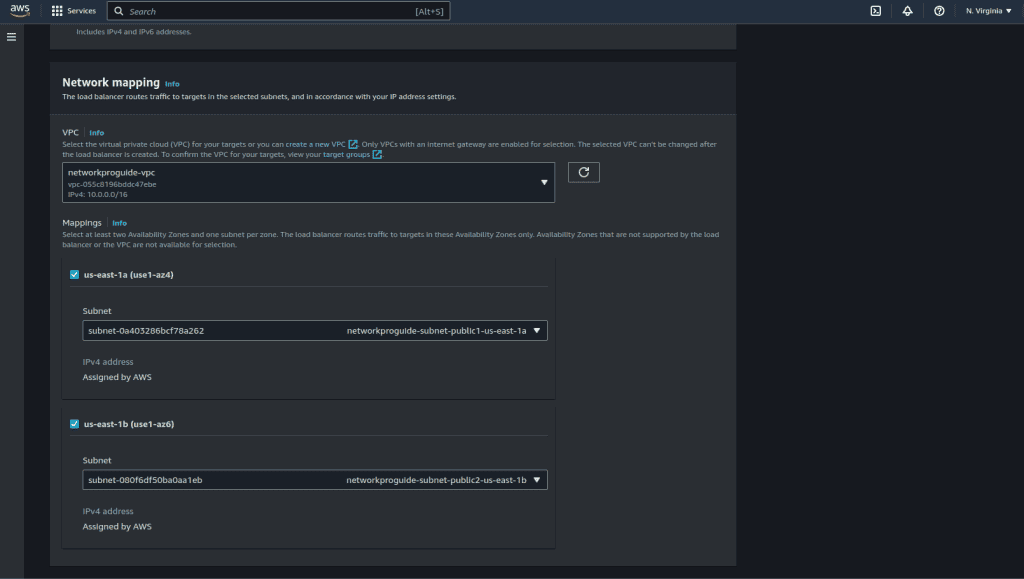
Select the VPC that we have created and also select the two public subnets that we have created above as shown in the figure below.
Select the same security group as EC2 instances. (It should allow HTTP traffic from anywhere.)
Keep other settings as default and scroll down to the “Listeners and Routing” section.
Click on “Create Target Group”. It will open the target group page on another tab.

Select “Instances” and give the name of that target group.

Keep all things as default and click “Next.”
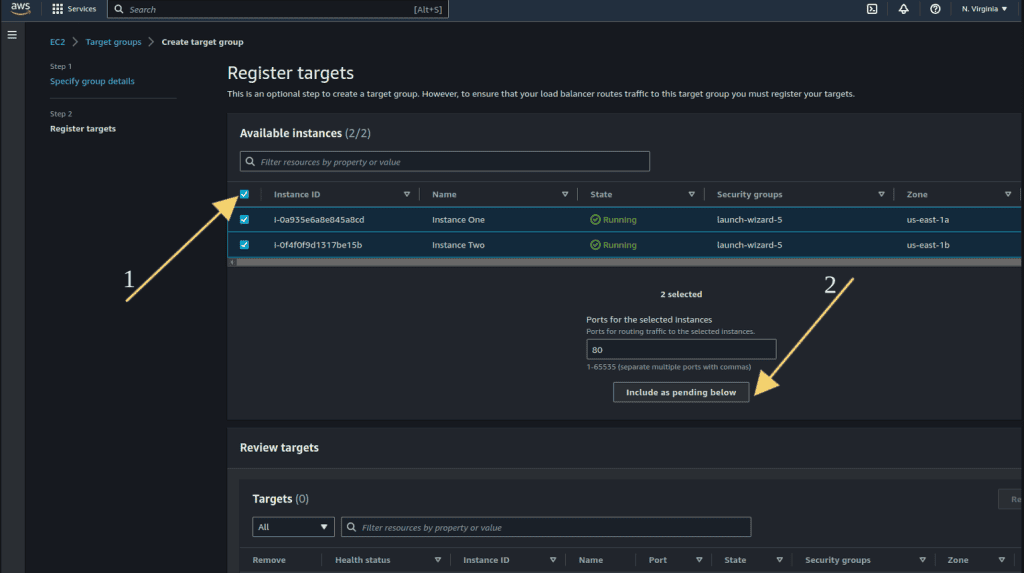
It will show the instance list that we have created.
Select two instances and click on “Include as pending below.”
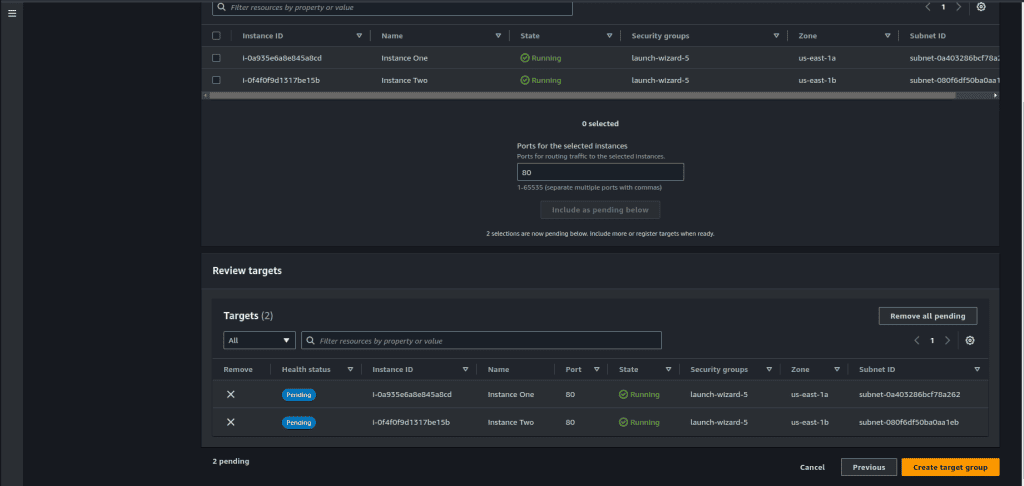
Now click on “Create target group.”
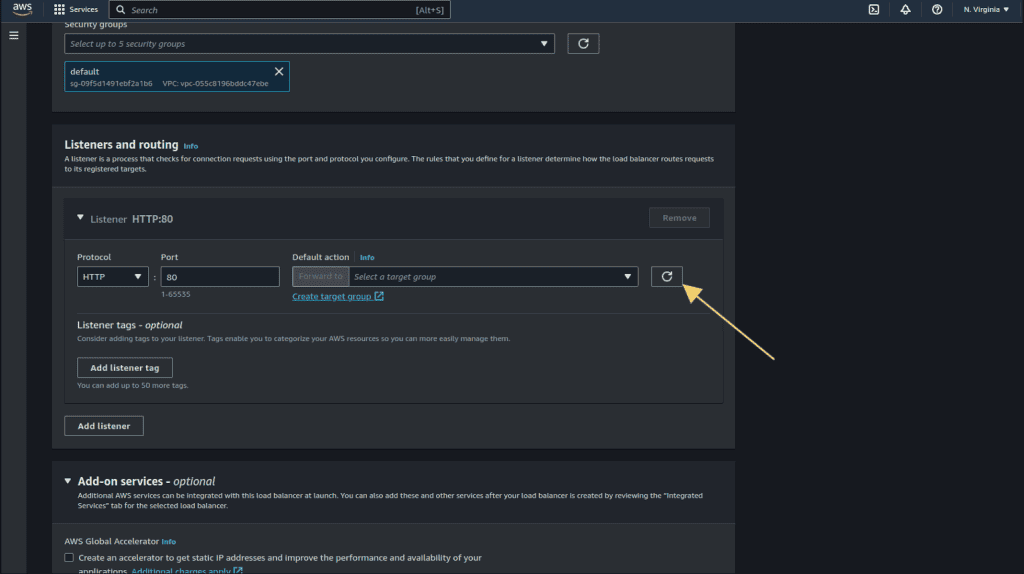
Go to the previous tab of ALB, and click on the refresh icon under listeners and routing.
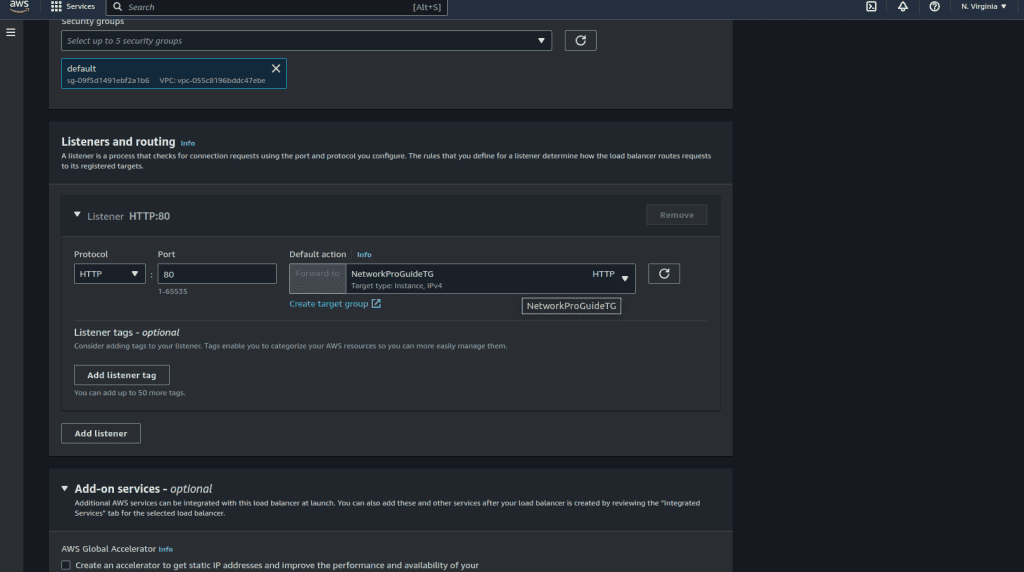
Select the target group that we have created.
Now click on “Create load balancer.”
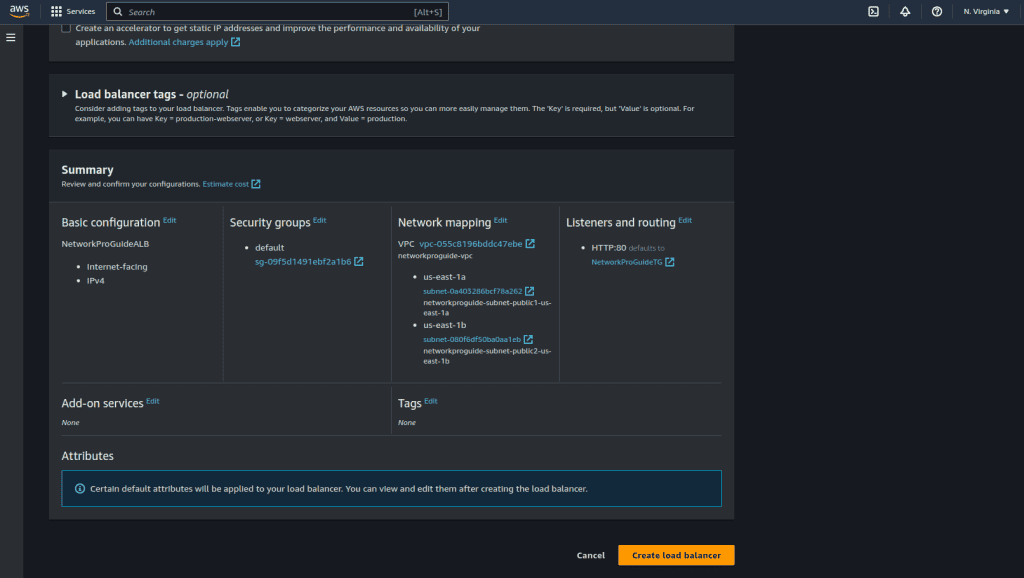
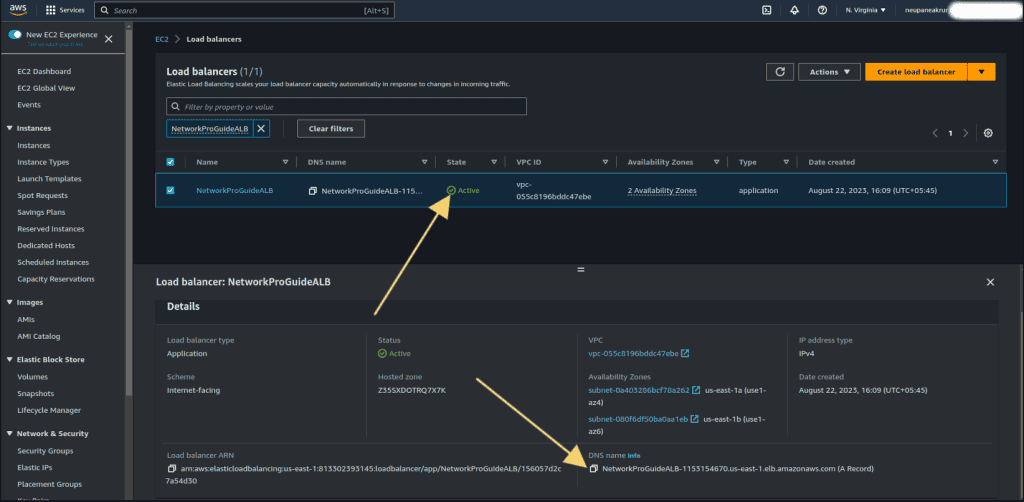
View the load balancer and wait for the state to be updated from “Provisioning” to “Active.”
You can now access the instance from the DNS name given by the load balancer. (you can copy the DNS name from the details as shown in the figure.)
Paste the DNS value in the browser. You can see the webpage from the DNS name.

Refresh the page which you have accessed from DNS, you can see the IP address changes as we refresh the page. It’s because ALB has distributed the traffic between two instances.

Now we have successfully created ALB and distributed traffic among the instances
Step 5: Creating an Application and Database Tier
For the Application Tier, create another two EC2 instances in two private subnets. Update the security group rules so that these instances will only be configured to allow inbound traffic access from the Web Tier.
Next, set up a MySQL database within the two private subnets specifically for the Application Tier. The Application Tier will be able to establish connections and interact with this database.
(Make sure to update the route tables for private subnets and security groups so that they can communicate with each other.)


