How to Create AWS VPC Peering Connection Step-by-Step
VPC peering allows you to connect two VPCs in the same or different AWS accounts. It operates over the AWS network backbone, ensuring low-latency and high-bandwidth communication between the peered VPCs.
When you create a VPC peering connection, you need to choose the “Requester VPC” and “Accepter VPC.” The requester initiates the peering request, while the accepter approves it. This bidirectional connection enables private IP address communication between instances in the peered VPCs.

Regarding VPC peering in AWS cloud, there are several options and circumstances:
- Two or more VPCs can be connected to one another within the same account.
- Two or more VPCs in different AWS accounts can be connected.
- You can establish peering relationships between VPCs in the same account across different AWS Regions.
- You can establish peering relationships between VPCs in the different accounts across the same AWS Region.
Steps for creating VPC Peering in AWS
Step 1. Create two VPC
You need to have two VPCs. If you don’t have two VPCs then you can learn how to create VPCs here. As you can see I have my two VPCs. One is the requester VPC and another is the accepter VPC. (Just make sure that you use different, non-overlapping subnets for the 2 VPC.)

Step 2. Navigate to the VPC Dashboard
Open the Amazon VPC dashboard where you can manage VPC configurations.
Click on “Peering Connections” in the left-hand navigation pane.
Click the “Create Peering Connection” button.

Type the name of the peering connection.
Select the Requester VPC from the dropdown menu.

Also, select the Accepter VPC from the dropdown menu. (If you want to add an accepter from another region then click on “Another Region” or if the VPC is from another account click on “Another Account” and fill in the details required.)
Click on “Create peering connection.”

Now you will see the message for connection request.

Step 3. Accepting the VPC Peering Request
Click on the Action Button and Select “Accept Request.” (If you have a different region and different account, switch to the respective VPC Peering Connection tab and Accept the request.)

You will see the success message after that.
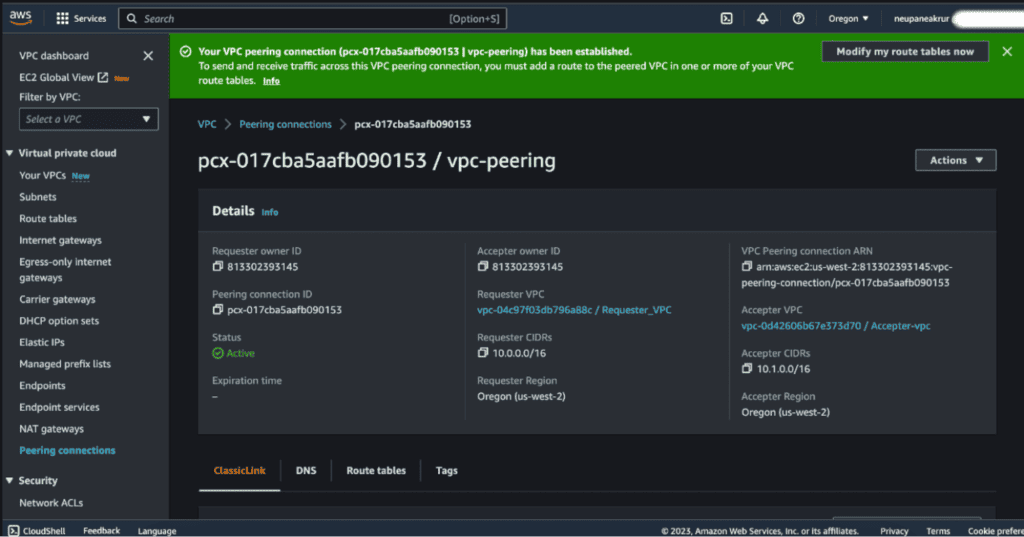
Copy the VPC peering id (i.e pcx-XXXXXX), we will need that later.
Step 4. Modify Route Tables of Requester and Accepter VPC
Click on “Modify my route table now” from the success message box.

Select the Accepter VPC Route Table and Click on “Edit Routes.”

Now click on “Add route.”
In the “Designation” add the CIDR of Requester VPC and in the “Target” add the VPC Peering ID that we have copied from above.
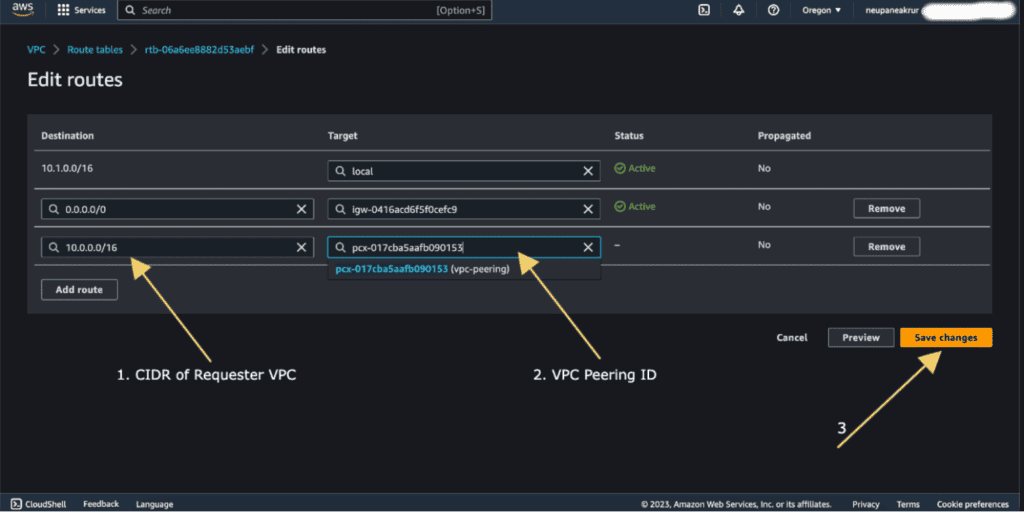
Click on “Save Changes.”
Now also select the Requester VPC route table and add the CIDR of Accepter and VPC Peering ID as above.
Step 5. Check the Peering Status
Return to the VPC Dashboard.
Verify that the peering status is “active.”
Step 6. Testing the connection
To test the connection I have created two instances, in Requester VPC and in Accepter VPC. Both of them have public and private IP. Then I will curl the accepter instance from the requester instance through the private IP of the accepter instance.
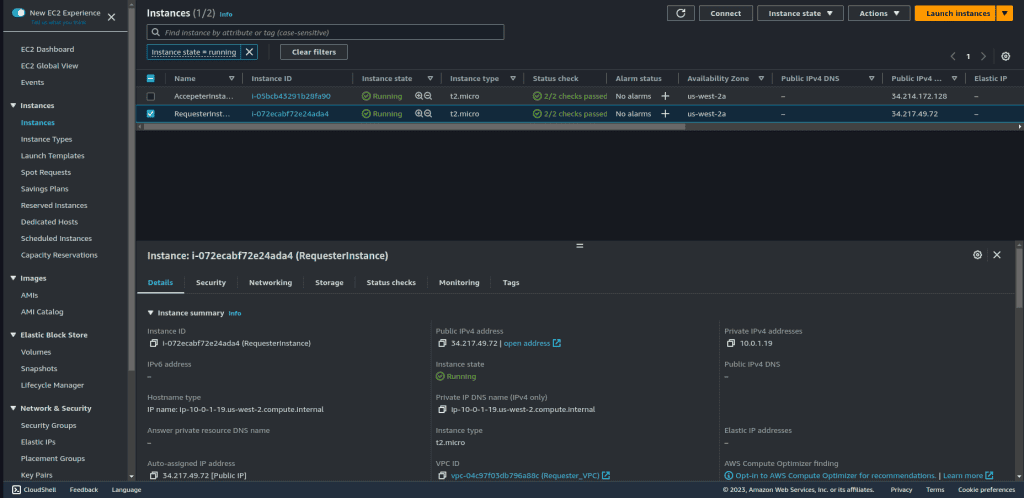
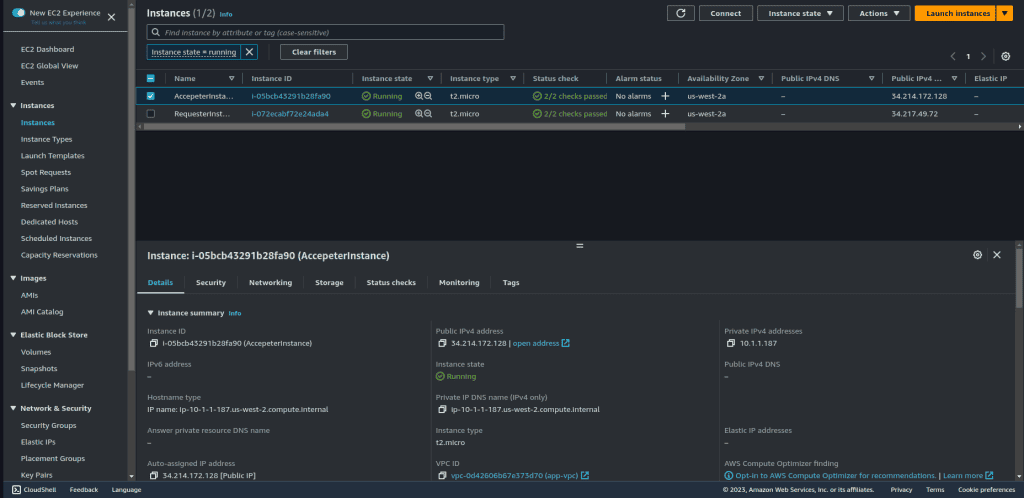
The user script data that I have used while launching the instance is:
#!/bin/bash

apt update

apt install -y apache2

systemctl start apache2

systemctl enable apache2

echo "Hello world from $(hostname -f)" > /var/www/html/index.html
I will now ssh to the Requester VPC instance and curl the instance in Accepter VPC through its Private IP.
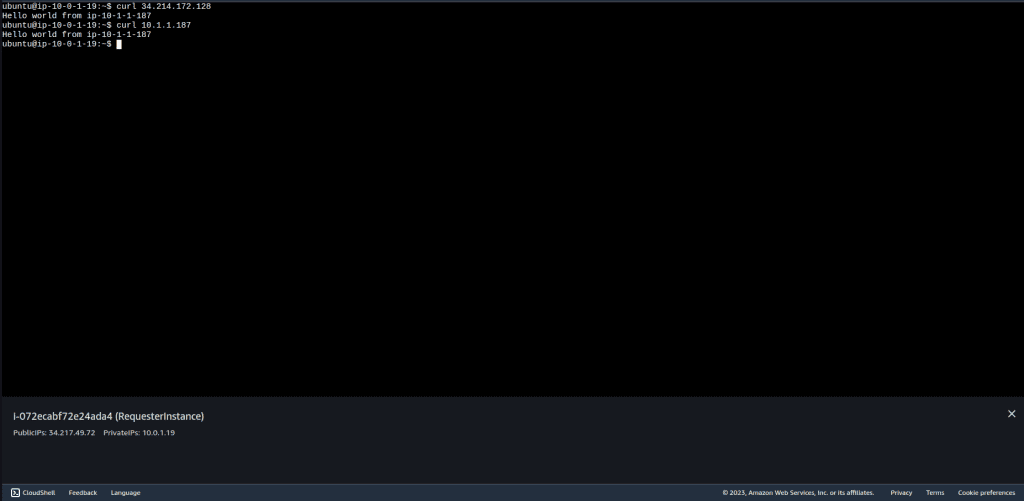
We have successfully created VPC peering between two VPC. Then we have also tested it by launching EC2 on each VPC by doing the curl on the accepter VPC using private ip.
Steps for deleting a VPC peering connection
When a peering connection is no longer needed, it’s a best practice to delete it. VPC connections left active that are no longer necessary are a security concern and could incur unnecessary costs, depending on the setup, among other things. Deleting a VPC Peering Connection in AWS is a straightforward process and involves just a few steps.
Note: You can delete a VPC peering connection from either the requester VPC or the accepter VPC. Deleting a VPC peering connection is a significant action that will stop all traffic between the VPCs. It should only be done when necessary and after considering the implications.
Step 1. Open the Amazon VPC console
You can access this directly through the link https://console.aws.amazon.com/vpc/ or by searching for VPC in the AWS Management Console search bar.
Step 2. Go to the ‘Peering Connections’ section
In the navigation pane, click on ‘Peering Connections’.
Step 3. Select the VPC Peering Connection
You’ll see a list of your existing VPC Peering Connections. Select the one that you want to delete.
Step 4. Delete the VPC Peering Connection
After selecting the VPC Peering Connection, click on ‘Actions’ and then ‘Delete VPC Peering Connection’.
Step 5. Confirm the deletion
A confirmation dialogue box will appear. Confirm the deletion by clicking ‘Yes, Delete’.
After the VPC Peering Connection is deleted, you won’t be able to reinstate it. You’ll need to create a new VPC Peering Connection if you want to re-establish the link.
Important Note: Deleting a VPC Peering Connection does not automatically update the route tables. You must manually remove any routes in your route tables that point to the deleted VPC peering connection. If you don’t, the routes will remain, but will be inactive.
To remove the routes, navigate to the ‘Route Tables’ section in the VPC console, select the route table, and then the ‘Routes’ tab. Select the route that points to the VPC peering connection and click ‘Delete’. Confirm the deletion when prompted. Repeat this for each route in every route table that points to the deleted VPC peering connection.
AWS VPC Peering Best Practices
When implementing Virtual Private Cloud (VPC) peering on Amazon Web Services (AWS), there are several best practices to consider. Every architecture is unique, so these best practices should be adapted based on your specific requirements and the nature of your workloads.
Non-Overlapping IP Addresses
Make sure the CIDR blocks (IP address ranges) for the VPCs being peered do not overlap. VPCs with overlapping CIDR blocks can’t be peered together. This is a limitation of routing.
Use Smallest Possible CIDR Block
Allocate the smallest possible CIDR block that will meet your current and foreseeable future needs. This is important to ensure that you don’t run out of available CIDR blocks for peering.
Efficient Route Tables
Optimize route tables in each VPC to manage the flow of traffic. Only add the necessary routes to your route tables.
Security Group and Network ACL Management
Use security groups and network ACLs to control inbound and outbound traffic between the peered VPCs. Make sure the rules are properly set up to allow necessary traffic and deny unnecessary or potentially malicious traffic.
Use DNS Names
Enable DNS resolution for peering connections if the applications communicate using DNS names. This way, applications can use DNS hostnames to communicate with each other.
Plan for Region Considerations
If you have VPCs in different regions and they need to communicate with each other, remember that inter-region VPC peering will have additional data transfer costs compared to intra-region peering.
Limit VPC Peering Connections
The number of peering connections that can be made per VPC is limited (you can request limit increases, but it’s better to use peering judiciously).
Monitor Traffic and Set Alerts
Continuously monitor the traffic flowing through your VPCs using services like VPC Flow Logs and CloudWatch. Set up alerts for any unusual activities.
Implement VPC Peering Connectivity in a Hub-and-Spoke Network Topology
If you have many VPCs that need to communicate with each other, consider implementing a hub-and-spoke model. In this model, you have a central ‘hub’ VPC that is peered with multiple ‘spoke’ VPCs. This minimizes the total number of peering connections and simplifies network configuration.
Consider AWS Transit Gateway for Scalability
If you have many VPCs (typically in the order of hundreds), it might be more efficient and easier to manage connections using AWS Transit Gateway rather than setting up individual VPC Peering connections.


