Using ipconfig: Breakdown of Commands and Options
The ipconfig command is built into the Windows 11 and Windows Server operating systems and provides valuable info about your computer’s network settings. The base ipconfig command shows you your IP address (IPv4 and IPv6), subnet mask, and default gateway, though there are many other option switches available that can give you even more detailed information.
Let’s take a closer look at the Windows ipconfig command and break down the various options that are available.
How to use ipconfig command on Windows
Using the ipconfig command is easy, just follow these steps:
Step 1: Open a Command Prompt or PowerShell window
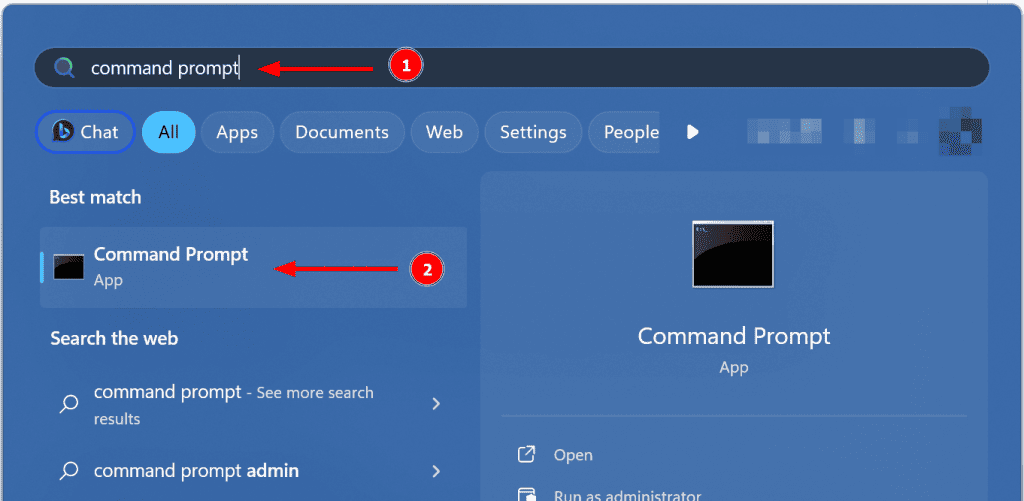
Open the Windows start menu and search for Command Prompt or PowerShell, then click on the app to launch it.

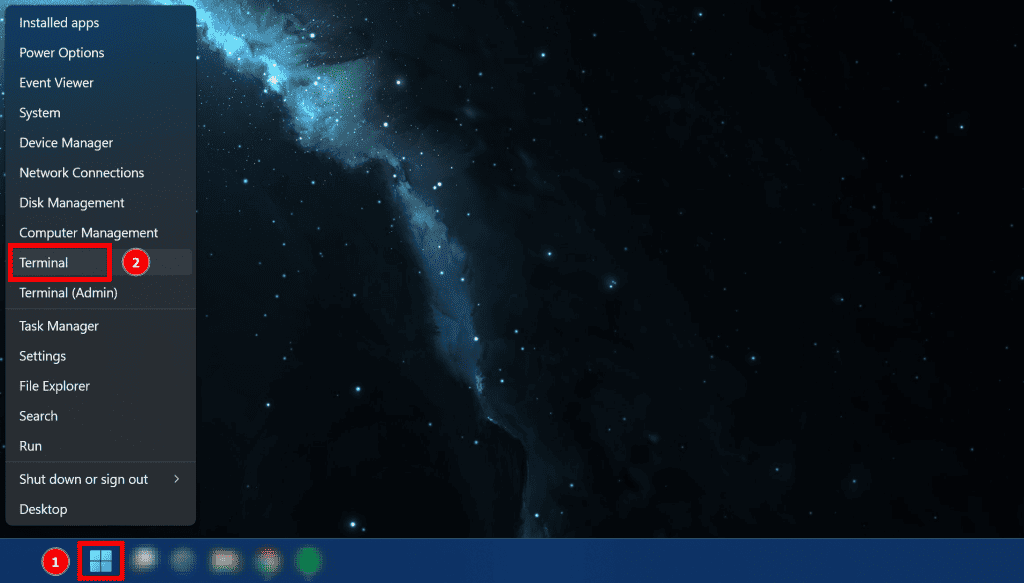
You can also right click the start menu and click on Terminal which will open a PowerShell window.

Step 2: Type “ipconfig” and hit the Enter key
Type ipconfig into the window and hit the enter button.

The output will contain basic network information about each of the network adapters on your computer or server. To get more detailed information we need to use one or more of the command options discussed below.
Using the ipconfig /all command
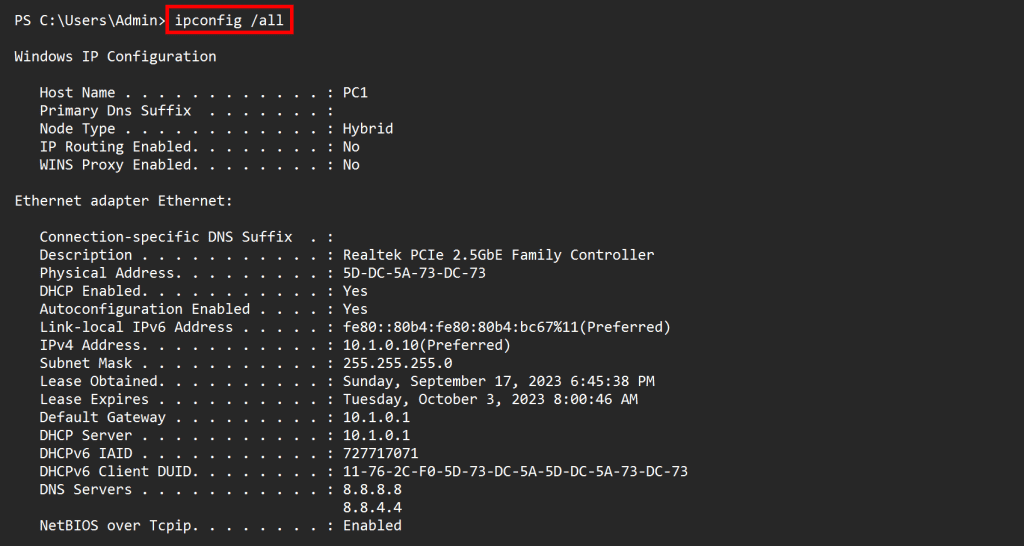
The ipconfig /all command provides a comprehensive list of information about each adapter, including the IP address, subnet mask, default gateway, DNS server, MAC address, and more.
ipconfig /all

Here are some of the key pieces of information that the ipconfig /all command provides:
- Physical Address: This is your MAC address. This is the physical address of the network adapter. It is used to identify the adapter on the network.
- DHCP Enabled: Tells you whether your IP address is DHCP assigned or set statically.
- Autoconfiguration Enabled: Part of APIPA. Assigns private IP address when DHCP server isn’t reachable.
- Link-local IPv6 Address: The IPv6 address of your computer.
- IPv4 address: This is the unique internet protocol (IP) address assigned to each network adapter on your computer. It is used to identify your computer on the network. If someone asks you for your IP address and doesn’t specifically mention IPv6, then IPv4 is what they are asking for.
- Subnet mask: This is used to determine which portion of the IP address represents the network and which portion represents the host.
- Lease Obtained: The timestamp that your computer’s IP address was assigned by DHCP.
- Lease Expires: The timestamp your computer’s IP address lease by the DHCP server will expire and be renewed.
- Default gateway: This is the IP address of the router that connects your computer to other networks, such as the Internet.
- DHCP server: This is the IP address of the server that handed out your computer’s IP address.
- DHCPv6 IAID: Unique hardware identifier for the interface on the computer for DHCPv6 (part of IPv6). Part of RFC3315.
- DHCPv6 Client DUID: Unique identifier for the computer system itself (rather than just a single interface like with DHCPv4).
- DNS server: This is the IP address of the server that translates domain names into IP addresses. Sometimes your router will act as a DNS proxy and you will see the same address here as that of your Default Gateway. You’ll then need to log into your router to see what DNS servers it’s using.
Using the ipconfig /release command
If you want to reset the network settings on your pc or server, you can use the ipconfig /release command. This command sends a DHCPRELEASE message to the DHCP server essentially telling it that you no longer want the assigned IP Address. Without any extra parameters the /release option releases the IP Addresses of all your network adapters. If you want to release the IP of a particular adapter, you can enter the name of the adapter at the end of the command like so:
ipconfig /release [adaptername]
Below is a screenshot showing the name of the Ethernet adapter:

Using the above screenshot as an example, if you wanted to release the address of just the Ethernet adapter, you would type:
ipconfig /release Ethernet

You can also use a wildcard at the end to specify releasing the address of all the adapters that start with Ethernet
ipconfig /release Ethernet*
This command also works for IPv6 addresses with the /release6 option.
Keep in mind when you release your IP Address, your computer will no longer be able to communicate with other devices on the network until you obtain a new IP Address. To obtain a new IP Address, you must use the ipconfig /renew command.
If you want to learn more about how DHCP works, you can read this article.
Using the ipconfig /renew command
To request a new IP address from the DHCP server, you can use ipconfig /renew. This command will renew the IP address for all network adapters. Just like above, if you want to renew the IP address for a specific adapter, you can specify the name of the adapter in the command, like this:
ipconfig /renew Ethernet

After the renewal is successful, you will see a summary of the new IPv4 address, Subnet Mask, and Gateway, similar to the output of the ipconfig command. This command also works for IPv6 addresses with the /renew6 option.
Using the ipconfig /displayDNS command
If you are experiencing issues with name resolution, you may want to check your DNS cache. The DNS resolver cache temporarily stores the locations (IP addresses) of web servers that host websites and other domains, which your computer has recently accessed. This cache can help speed up subsequent requests to the same domains because the DNS information is available locally and does not need to be fetched over the internet each time. You can view the contents of the DNS resolver cache by using the ipconfig /displaydns command.
ipconfig /displaydns

Running ipconfig with the /displaydns option will display every DNS record in your DNS cache. The output includes the DNS name of the record, the record type (indicated by a number), the time to live (in seconds), the length of the record in bytes, the section (answer or additional), and the actual value of the record. Here is a breakdown of each piece of output:
- Record Name – The domain name that was queried.
- Record Type – The type of DNS record, such as A, MX, CNAME, etc… in numerical format.
- Time to Live – How long this DNS record will remain valid and thus cached on your computer.
- Data Length – The size or length in bytes of the memory address data containing the DNS record text.
- Section – This refers to the part of the DNS that this record pertains to. In DNS, there are several sections, including:
- Answer: Contains resource records for the query that was made.
- Authority: Contains resource records pointing towards an authoritative DNS server.
- Additional: Contains resource records that may be useful in using the records found in the Answer section.
- [type] Record – The resolved IP address or DNS record info.
Using the /flushDNS command
If you’re experiencing issues with dns resolution or connecting to websites, you can use the ipconfig /flushdns command to clear the DNS resolver cache. This command will remove records that may be outdated or invalid. It’s a safe process. After running the command, your computer immediately requests new records from your DNS servers. So no worries about making matters worse while troubleshooting.
ipconfig /flushdns

Running ipconfig on a remote computer
The advantage of learning to use ‘ipconfig’ instead of the Windows graphical user interface (GUI) lies in the ease of utilizing it on a remote computer using tools like PsExec or PSRemoting. As an example, let’s use PsExec.
First, download PsExec from Microsoft here: https://learn.microsoft.com/en-us/sysinternals/downloads/psexec
You can then call the PsExec software via command prompt or powershell and use the following string to run ipconfig on a remote pc:
psexec -i \\REMOTEPCNAME ipconfig /all
The above command executes ipconfig on the remote system with the /all switch, and displays the resulting output locally.
Using ipconfig on Linux
Ipconfig doesn’t exist on Linux. To view basic information about your network adapters in Linux, use the ip or ifconfig (note that ifconfig is considered deprecated and is not installed by default on some newer Linux distributions) command instead. However, ip and ifconfig don’t show DNS server information like the ipconfig command does on Windows.
Using ip:
ip a
or
ip addr show
Using ifconfig:
ifconfig
Viewing DNS Information on Linux
DNS information is usually stored in the /etc/resolv.conf file in most Linux distributions. You can use a text viewer/editor or cat to display this information.
Using cat:
cat /etc/resolv.conf
This will display the nameservers (DNS servers) that your system is configured to use.
Releasing and Renewing IP Address on Linux
To renew a DHCP lease, you can use the dhclient command. You might need to release the current IP address and then renew the DHCP lease.
Release and renew the DHCP lease for all adapters:
sudo dhclient -r
sudo dhclient
Or, for a specific network adapter (e.g., eth0):
sudo dhclient -r eth0
sudo dhclient eth0
Your network interface might have a different name, like ens160 or enp0s3. You can find your network interface name with ip a or ifconfig.


