Powershell: Export Active Directory Users to CSV
Exporting Users from Active Directory is a really simple task, even if you’re not very familiar with PowerShell.
As long as you have an account with sufficient permissions to read from Active Directory you’re good to go.
Lets step through a few examples below of the most common scenarios to export ad users to csv (and one method that doesn’t involve PowerShell for people who prefer prefer a GUI or just dislike PowerShell).
How to Export Users from Active Directory
The first thing for you to do is open a PowerShell session either locally on a Windows Server machine running the AD DS role (like a Domain Controller) or install the Remote Server Admin Tools (RSAT) so that the Active Directory module is available.
Determine which Attributes to Export
When it comes to exporting users you have a lot of options for the information you want exported. User accounts have a lot of associated attributes (which you can see if you go to Extension -> Attributes in Active Directory Admin Center).
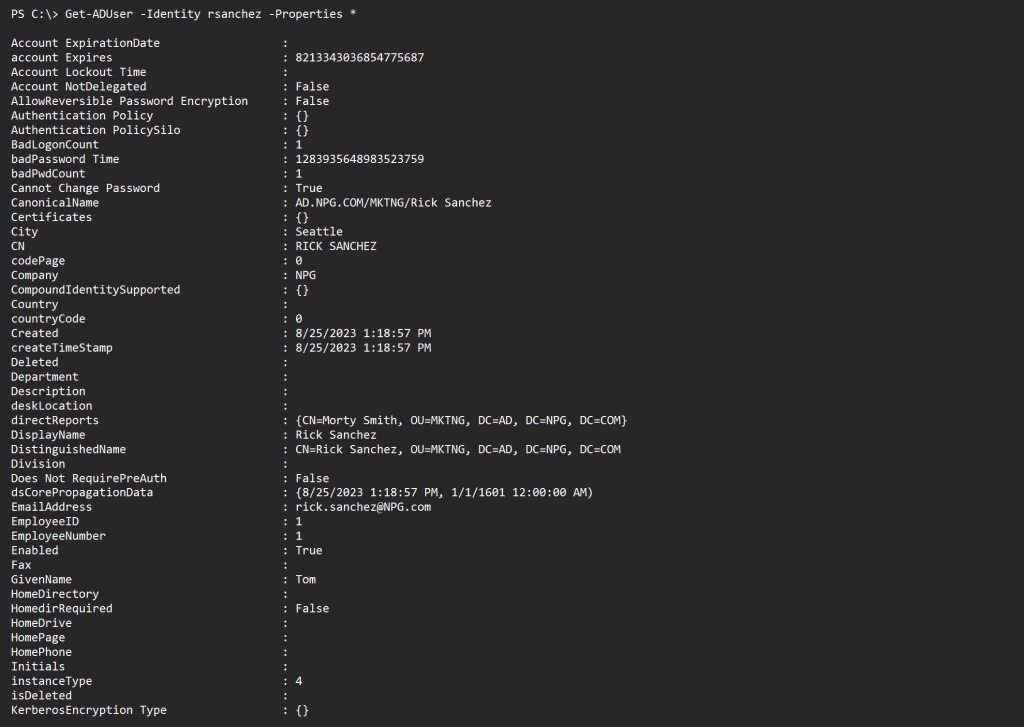
Another way to see the attributes you have available to export is to run the following get-aduser command within your PowerShell window:
Get-ADuser -Identity rsanchez -properties *
In this command we are using the -Identity parameter to specify a specific account for output. When using the -Identity parameter you can use any one of the following attributes for the identifier:
- DistinguishedName (DN)
- SamAccountName
- GUID
- SID
Output:

Now that you know what you’re after, lets look at some examples!
Export All AD Users by Name to CSV
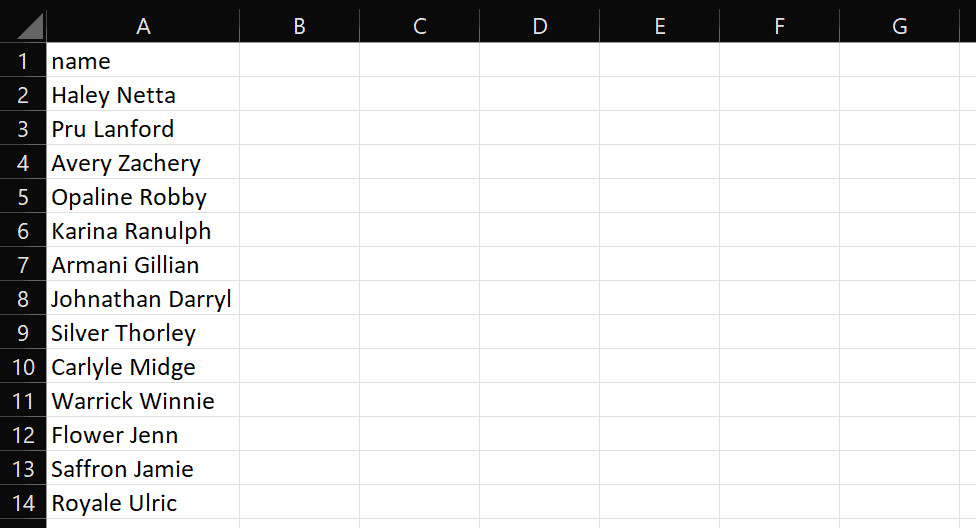
Get-ADUser -Filter * -Properties * | Select-Object name | export-csv -path c:\temp\userexport.csv
This command will export all of the user accounts in your domain to a CSV by their name. What this means is that the CSV file will contain a single column list of every account’s First, Middle, and Last name.
The ‘export-csv -path c:\temp\userexport.csv’ after the pipe (the | character) is what exports the data to CSV. If you drop that section of the command it’ll simply print the results to your PowerShell window.

Export All AD Users by Name and LastLogonDate
If you want a list of every account’s name and the last date the account authenticated with the domain then you can run the command:
Get-ADUser -Filter * -Properties * | Select-Object name, LastLogonDate | export-csv -path c:\temp\userexport.csv
The ‘lastLogonDate‘ attribute is a locally calculated value of the ‘lastLogonTimestamp‘ attribute in a more “human readable” date format.
This will export all accounts in your domain to a CSV sheet with the First, Middle, and Last name in the first column and LastLogonDate in the second column.

If you want to export more attributes you just need to add them the Select-Object section of the command separated by a comma. For example:
Export All AD Users by Multiple Specific Attributes
Get-ADUser -Filter * -Properties * | Select-Object name, lastlogondate, department | export-csv -path c:\temp\userexport.csv
Export All AD User’s Email Addresses
Get-ADUser -Filter * -Properties * | Select-Object mail | export-csv -path c:\temp\userexport.csv
Export All AD Users from Specific OU (Organizational Unit)
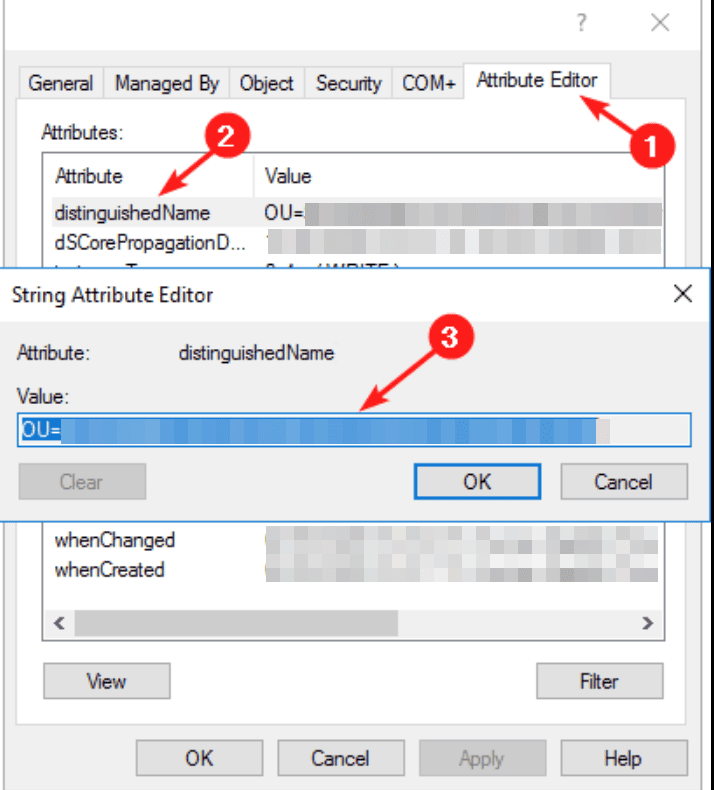
Before you run this command you need to find the distinguishedName attribute of your OU. You find this by opening the properties of the OU in Active Directory Admin Center and going to Extensions -> Attribute Editor.

With the distinguishedName value in hand, we can make use of the -SearchBase command to filter the output by the desired OU using the following command:
Get-ADUser -Filter * -SearchBase "OU=Research,OU=Users,DC=ad,DC=npgdom,DC=com"
-Properties * | Select-Object name | export-csv -path c:\temp\userexport.csv
The output will look exactly as the previous example, only now we only have lines in our csv file for the users contained within the chosen OU.
I’m betting you’re getting the gist of it by now. Like I said, pretty easy!
Dealing with Large Directories
When you’re tuning your export string, you may want to limit the number of results you return so you don’t waste time and energy on test output, especially if you have a very large directory.
The -ResultSetSize parameter is useful when dealing with large Active Directory environments. By using -ResultSetSize, you can specify a limit to the number of objects returned. For example:
Get-ADUser -Filter * -Properties * | Select-Object name | export-csv -path c:\temp\userexport.csv -ResultSetSize 10
This would output a csv file containing the first 10 results in the name column.
How to Export User Accounts Using Active Directory Users and Computers GUI
If you’re not a big PowerShell person and you just need to pull basic information such as:
Name
User Logon Name
Type
Office
Description
Office Communications Server Address
E-Mail Address
Then you’ll be happy to know you can easily export this through ADUC. Plus, it’s really simple too!
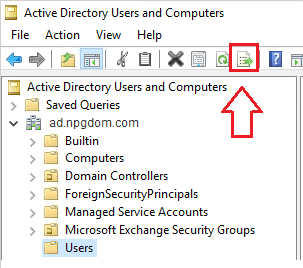
All you need to do is open ADUC, navigate to your desired OU, and click the Export List button.

This will export all of the accounts in the OU to a tab delimited text file. If you want to view the data in CSV form just change the extension from .txt to .csv (or right click and open in Excel and do a save as CSV).
While this method is nowhere close to as flexible as PowerShell, it may be all you need.
If you’re interested in exporting Users that are members of a specific group check out our tutorial Active Directory Export Group Members to CSV.


If fails in my case as I have an ou with spaces in names like “3 student high”
can you help please ??
Ensure you back up at first!
Duplicate the OU, rename the new copy to a name that is simpler – without spaces, then try again
How about if I want to get all users in all OUs?
@Chaim Just leave off the -SearchBase switch
Thank you for the info it is working great.
I have users with different descriptions such as ADSYNC1, ADSYNC2 etc.
How do I export the uses with the description of the uses? I only want users with ADSYNC1 to export.
Thank you.
found exactly what I was looking for, thanks