Configuring NAT Instance in AWS for Internet Access
A NAT instance is a specially configured EC2 instance within your AWS VPC that acts as a network gateway for private instances. It facilitates outbound internet access for private instances by translating their internal private IP addresses into their public IP address when sending requests to the internet.
NAT instances are commonly used for scenarios where private instances need to access external resources like software updates, package repositories, or other cloud-based services, all while keeping them hidden from direct internet exposure.

How a NAT Instance Works:
- When a private instance in a VPC needs to access the internet (e.g., for software updates), it sends its request to the NAT instance’s private IP address.
- The NAT instance receives the request and translates the source IP address to its public IP address, making it appear as if the traffic is originating from the NAT instance itself.
- The NAT instance then forwards the translated request to the internet or the destination specified.
- When the response is received from the internet, the NAT instance forwards it back to the original private instance based on the connection tracking information it maintains.
NAT instances are typically configured to allow outbound traffic only, which enhances security by preventing unsolicited incoming connections to your private instances.
Setting up a NAT Instance is super simple. Let’s walk through a quick lab where we set up a Bastion Host to connect into a private EC2 instance and then launch a NAT Gateway to let traffic out to the outside world.
Step 1: Launch a Bastion Host
In AWS, a bastion host is a publicly accessible server located in a public subnet that acts as a bridge between your local machine and private instances in a Virtual Private Cloud (VPC). It serves as a secure entry point for accessing private instances in a controlled way.
In the EC2 Dashboard, select “Launch Instance” to create a new EC2 instance.
Choose an appropriate Amazon Machine Image (AMI) for your bastion host.
Configure the instance details, including the public subnet, instance type, and any additional storage or tags.
Configure the security group for the bastion host. Ensure that it allows incoming SSH (port 22) traffic from your IP address.

Launch the bastion host instance.
Step 2: Launching EC2 Instances in the Private Subnet
In the EC2 Dashboard, select “Launch Instance” to create a new EC2 instance.
Configure the instance details, such as name, instance type, etc.
Create and Download the key pair on your machine. We will need that later.
Configure the instance details and select the private subnet you created.

Complete the instance setup, including security groups and key pairs, as needed. Allow SSH Access from Bastion Host.

Launch the EC2 instance.
Step 3: Configure SSH Access
On your local machine, open a terminal and use the SSH key pair associated with your bastion host to connect.
(Replace /path/to/your/keypair.pem with the path to your SSH private key file and bastion-host-public-ip with the Elastic IP of your bastion host.)
nano DemoKeyPair.pem

Step 4: SSH into Private Instances
Create a new file named DemoKeyPair.pem in the instance.
nano DemoKeyPair.pem

Paste the content of the key pair of your Private EC2 instance in the editor.

Save it. (Ctrl + X, then Yes)
Change the ownership of the pem file.
chmod 0400 DemoKeyPair.pem
After that, use SSH agent forwarding to securely access your private instances:
ssh -i "privateInstanceKey.pem" ubuntu@private-instance-private-ip
(Replace private-instance-private-ip with the private IP address of the target private instance and the privateInstanceKey.pem with the pem file name.)

Let’s check if there is internet access from the private instance.

Step 5: Launching a NAT Instance
Log in to your AWS Management Console and go to the EC2 Dashboard.
Click on “Launch Instance” to create a new EC2 instance.
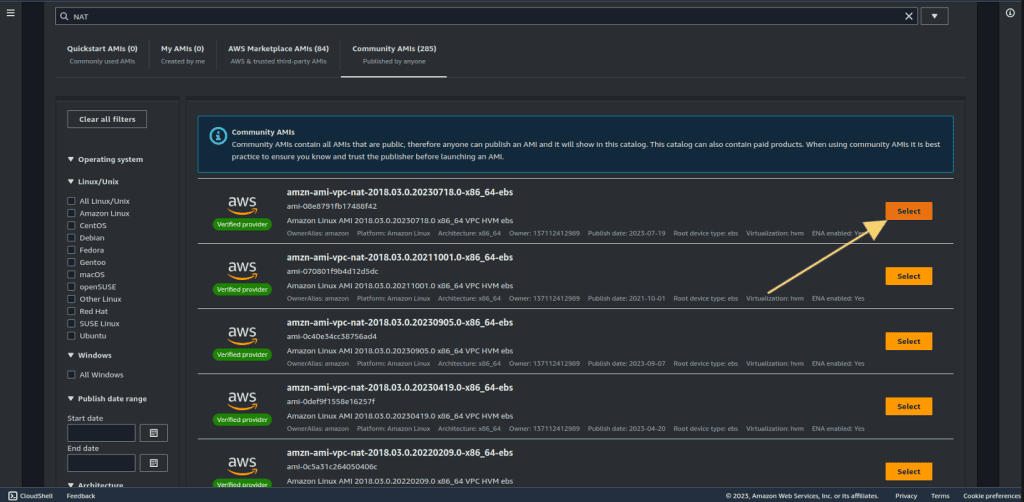
Click on “Browse more AMIs”

In the “Choose an Amazon Machine Image (AMI)” step, select “AWS Marketplace” from the navigation.
Search for “NAT” in the AWS Marketplace and choose one that suits your requirements. Choose the community.

Select the latest AMI or the AMI that suits your requirements.
Select or Create the key pair.
Choose your VPC and Public Subnet.

Create a new security group. Give the name and description of it.
Configure these Inbound Rules:
- Type: ssh, Source type: Anywhere
- Type: HTTP, Source type: Custom, Source: your-vpc-cidr-block (same as your VPC, e.g.: 10.0.0.0/16)
- Type: HTTPS, Source type: Custom, Source: your-vpc-cidr-block (same as your VPC, e.g: 10.0.0.0/16)
- Type: All ICMP IPv4, Source type: Custom, Source: your-vpc-cidr-block (same as your VPC, e.g: 10.0.0.0/16)

Click on “Launch Instance.”
Step 6: Configuring private instance to send internet traffic out through NAT Instance
Select your NAT Instance.
Then, click on “Action”, “Networking” and then “Change source/destination check.”

Click on “Stop” on Source/destination checking.

Click on “Save.”
Step 7: Sending Traffic to the NAT Instance
From the bastion host, SSH into your private instance.
Let’s check if there is internet access from the private instance.

Select your route table for the private subnet.
Click on “Actions”, then on “Edit Routes.”

Choose destination as “0.0.0.0/0”, target as “your-instance-id” and select the NAT Instance that we have created.

Click on “Save changes.”
Now we have a rule that is sending traffic through our NAT Instance.
Step 8: Test Internet Access
Confirm that your private instances in the associated private subnet can now access the internet by using the NAT instance as their gateway.

This setup allows a secure way to communicate with your private instances and allow them to communicate with the Internet through the NAT Instance.


