Configure SNMPv3 on a Cisco Catalyst Switch or Router
SNMP (simple network monitoring protocol) is an application-layer protocol that provides a message format for communication between managers and agents. The SNMP system consists of an SNMP manager, an SNMP agent, and a management information base (MIB). The agent and MIB reside on the device. To configure SNMP on the device, you define the relationship between the manager and the agent.
SNMPv3 works only with Cisco IOS version 15.2 and higher for Cisco Switches and IOS-XR version 12.0.3T and higher for Cisco routers. Use Cisco Feature Navigator to find information about platform support and Cisco software image support, which can be found here.
For our scenario we will configure SNMPv3 on a Catalyst 9k series running IOS-XE 17.06.04 following Cisco’s documentation. These steps will be applicable for Cisco Switches and Routers running IOS, IOS-XE, and IOS-XR.
Security features in SNMP version 3
Before we step through the setup, you need to understand the different security features and security levels provided in SNMPv3.
SNMPv3 includes three main security features:
- Message integrity – Ensures that a packet has not been tampered with during transit.
- Authentication – Determines that the message is from a valid source.
- Encryption – Scrambles the content of a packet to prevent it from being learned by an unauthorized source.
SNMPv3 is a security model in which an authentication strategy is set up for a user and the group in which the user resides. Security level is the permitted level of security within a security model. A combination of a security model and a security level determines which security mechanism is used when handling an SNMP packet.
SNMP version 3 security levels
| Level | Authentication | Encryption | What happens |
| noAuthNoPriv | Username | No | Uses a username match for authentication. |
| authNoPriv | Message Digest Algorithm 5 (MD5) or Secure Hash Algorithm (SHA) | No | Provides authentication based on the Hashed Message Authentication Code (HMAC)-MD5 or HMAC-SHA algorithms |
| authPriv | MD5 or SHA | Data Encryption Standard (DES) | Provides authentication based on the HMAC-MD5 or HMAC-SHA algorithms. In addition to authentication, it provides DES 56-bit encryption based on the Cipher Block Chaining (CBC)-DES (DES-56) standard. |
SNMPv3 authentication is not supported in the following scenarios:
- If there is a change in the switch priority followed by stack reload.
- If a device with a lower MAC address is added to the stack, the device will be elected as the active switch if all the switches in the stack have the same priority.
- To avoid SNMPv3 authentication failure, you should manually configure SNMP engineID on the device before SNMPv3 user configuration. With this, the user can manage and administer the device as the user is tied to the engineID.
Configuring SNMPv3 on a Cisco catalyst switch or router step-by-step
Prerequisites
Before you begin, make sure you have the following prerequisites in place:
- Access to the Cisco Catalyst Switch via a console, Telnet, or SSH session (see our tutorial on enabling SSH on a Cisco device).
- Credentials with administrative privileges to configure SNMP settings.
- Basic understanding of SNMP concepts and network terminology.
In this article, I have followed the below parameters:
- User account: monitor
- Group name: nmsgroup
- View name: testsnmpv3
- Hash Method: MD5
- Encryption Method: DES
- SNMP Manager Host: 192.168.136.3
Step 1. Check current SNMP settings in your running-configuration
Connect to your Cisco Catalyst Switch using your preferred method (console, Telnet, or SSH) and log in with administrative credentials. Once logged in, you will be in User EXEC mode. Enter the ‘enable’ command to access Privileged EXEC mode:
Access-SW>enable
Access-SW#
From Privileged EXEC Mode enter the command ‘show running-config | include snmp-server’ to show the current setting
#show running-config | include snmp-server

If you see no information or only ‘snmp-server community public RO’, you do not have SNMPv3 active in your running-configuration.
The output above shows that SNMPv1, 2c, and 3 are active.
Step 2. Enter Global Configuration mode
After entering Privileged EXEC mode, enter Global Configuration mode by typing ‘configure terminal’:
Access-SW#configure terminal
Access-SW(config)#

This allows you to edit the running-configuration.
(Note: To remove an existing SNMPv3 configuration use the ‘no’ version of any of the following 4 commands: ‘no snmp-server group nmsgroup v3 priv’, ‘no snmp-server group nmsgroup v3 auth’, ‘no snmp-server view testsnmpv3’, or ‘no snmp-server community public’. Or, simply use ‘no snmp-server’ to remove all configuration related to snmp-server.)

Step 3. Configure SNMPv3 views
Configure SNMPv3 views to determine which parts of the MIB can be accessed by SNMPv3 users. Replace <view-name> with an appropriate name for your view. In this example we use ‘testsnmpv3’:
#snmp-server view <view-name> iso included

Step 4. Create ACL to secure communication with SNMP server
Now you need to create a standard access-list to secure communication with the SNMP server. In this example, we use the standard access-list 41 (you can use any number) and SNMP server 192.168.136.3 to establish a secure communication channel.
#access-list 41 permit host 192.168.136.3 log
#access-list 41 deny any log

Step 5. Create group with name ‘nmsgroup’ and apply the ACL to the SNMP group
Now configure the SNMP server group to enable authentication for members of a specified named access list.
In this example, we use the SNMP server group ‘nmsgroup’ and view name ‘testsnmpv3’ to enable user authentication for members of the named access list 41.
#snmp-server group <group> v3 auth <read/write> <view> access <acl-name>

Optional: If you want to provide write access as well, the command would be:
#snmp-server group nmsgroup v3 auth write testsnmpv3 access 41
Step 6. Add user to an SNMPv3 group and configure password for the user
In this step, you will add the SNMP user to a SNMPv3 group. In this example, we add the SNMP server user ‘monitor’ to the existing group “nmsgroup’ enable user authentication and encryption for secure communication.
#snmp-server user <username> <group-name> v3 auth [md5|sha] <authentication-password> priv [des|AES] <Password>

Step 7. Exit Global Configuration mode
At this step you have to exit from global configuration mode using ‘end’ command:
Access-SW(config)#end
Access-SW#

Step 8. Save configuration
Finally, you have to save all the configurations you have made using ‘write memory’ or ‘copy running-configuration startup-configuration’ and press enter to write the configuration file into memory.

Step 9. Check your firewall rules (if any) to permit the device IP and SNMP monitor
If you have a firewall in between your SNMP Manager (Network Monitoring Systems) and device (Local device which you want to monitor) make sure that you have allowed the Source Device IP to permit communication through SNMP protocol port (UDP 161/162).
Step 10. Verify configuration
Verify your SNMPv3 configuration using the ‘show snmp group’, ‘show snmp user’, and ‘show access-list commands’.
Displays information about each SNMP group in the network with the ‘show snmp group’ command:
#show snmp group

Display information about configured characteristics of an SNMP user with the ‘show snmp user’ command:
#show snmp user

Display information on the Access-list for allowing communication with SNMP manager with the ‘show access-list’ command:
#show access-list
This will indicate the hit count. If you see the hit is increasing/matching, then the ACL is working.

At this point, you should be able to poll this device using your preferred NMS system using the SNMPv3 protocol.
Step 11. Configure SNMPv3 to send traps (Optional Configuration)
As an additional configuration, we can configure SNMP on our Cisco device to send traps as well. For this example, lets enable the SNMP service to send traps of ‘linkdown linkup’ specifically.
Enter global configuration mode again and enter the ‘snmp-server enable traps snmp linkdown linkup’ command:
#snmp-server enable traps snmp linkdown linkup

Configure the SNMP engine ID of our NMS system.
# snmp-server engineID { local engineid-string | remote ip-address [ udp-port port-number] engineid-string}
#snmp-server engineID remote 192.168.136.3 00000063000100a1c0b4011b
The engineID-string is a 24-character ID (Hexa-decimal) string retrieved from your NMS system. You don’t have to specify the entire 24-character engine ID if it has trailing zeros. Specify only the portion of the engine ID up to the point where only zeros remain in the value. Our example configures an engine ID of 00000063000100a1c0b4011b.

For our example we are using Solarwinds Orion NPM for SNMP monitoring. To find the engineID of our Solarwinds install we use the following steps:
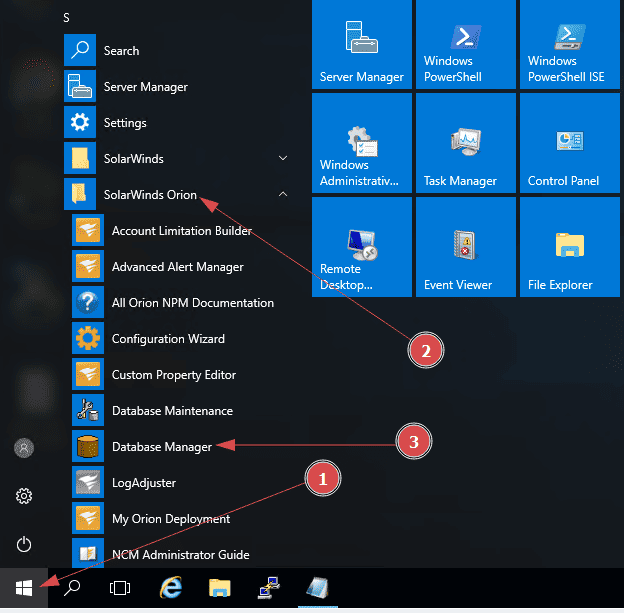
- Open database manager
- Navigate to Start > All Programs > Solarwinds Orion > Advanced Feature > Database Manager >
Click “Add Orion Server” and then SolarWinds Orion
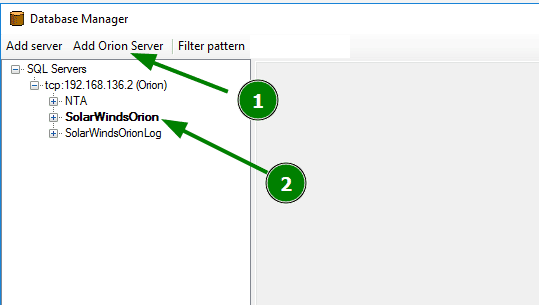
Check the EngineID assigned to the jobs in the NPM_JobEngineNPMJobs table. Compare that EngineID to the one on the AllEngines or Engines table in the database.

Step 12. Test configuration
Go to your NMS Monitoring system (Eg. Solarwinds Orion NPM) and add a new node:
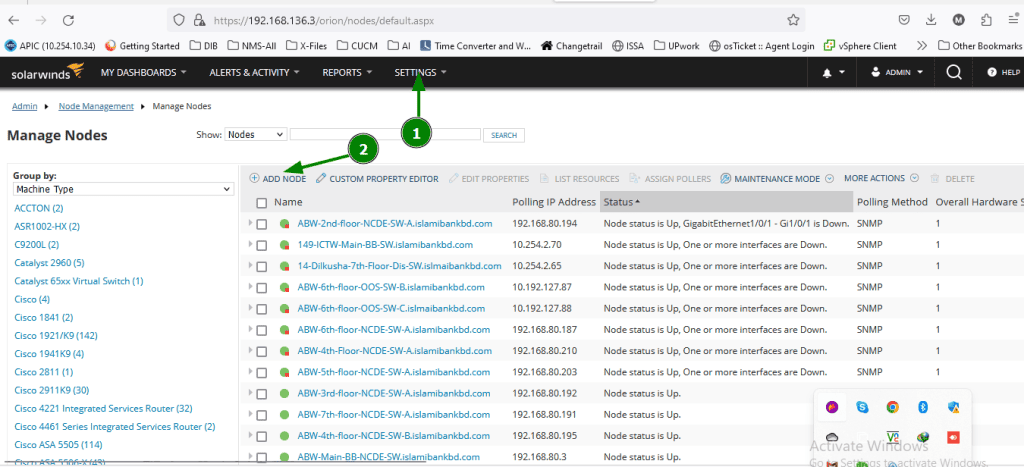
At this steps we have to provide following:
- Polling hardware IP address: 10.254.2.95 (in our Case)
- Polling method: snmpv3
- Snmp port: 161/162 (UDP)
- Snmpv3 credentials: User name: monitor
- Snmpv3 context (optional): (if you want to use context on any switches if several context exists.
- Snmpv3 Authentication: MD5, and Password: XXXXX
- Snmpv3 privacy/Encryption: DES/AES, and Password: XXXXX (you can use DES56 or AES128/AES192/AES256 (whichever one you configured on the cisco device) in our case we used DES56


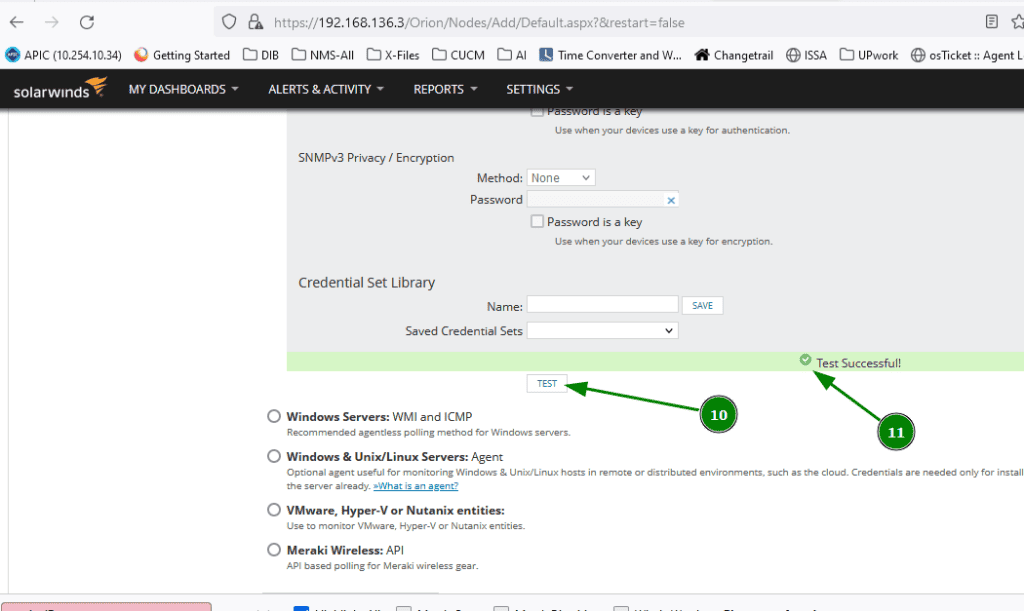
Finally, after providing all necessary credentials, click ‘TEST’ to test the connection. If it shows test successful then the device is ready to add to the NMS system for monitoring through SNMPv3.
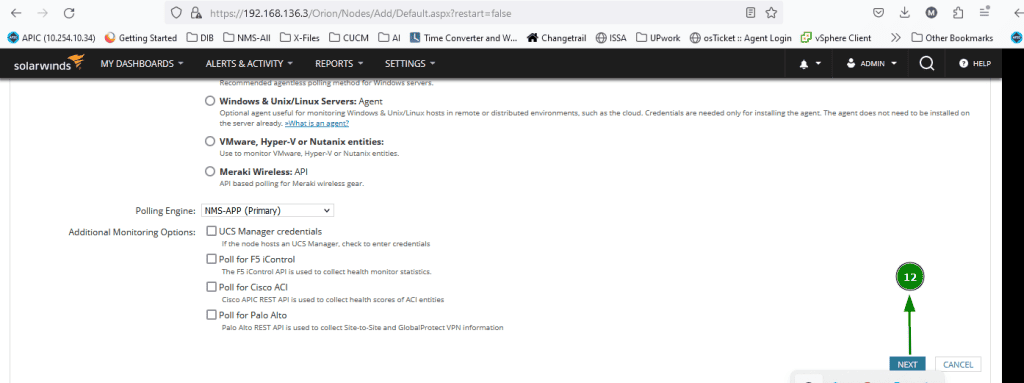
At this step we are going to add the device in our monitoring system. Click on ‘NEXT’.
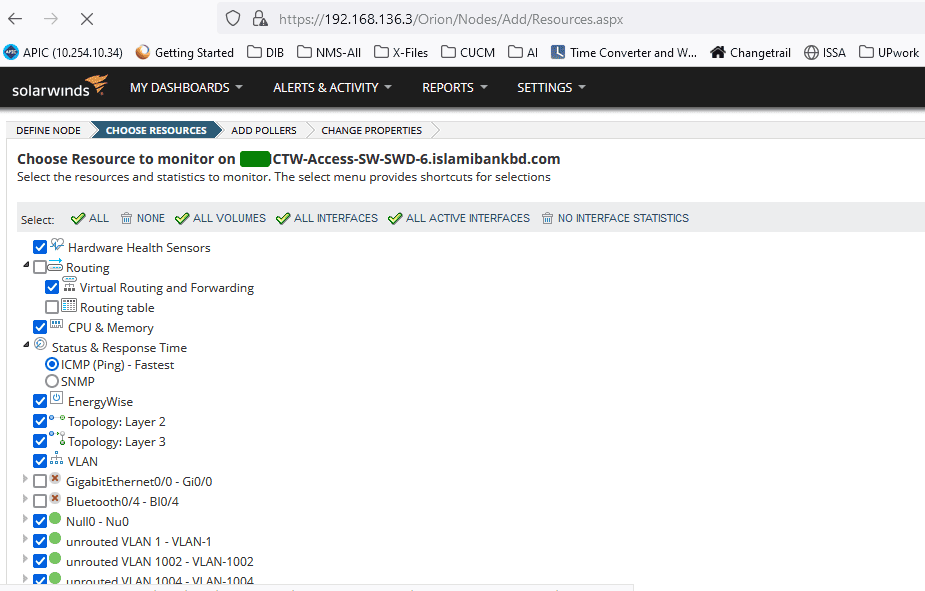
Now we are going to select the resources that we want to monitor. Select all the resources and click on ‘NEXT’ to add pollers and next to change custom properties.
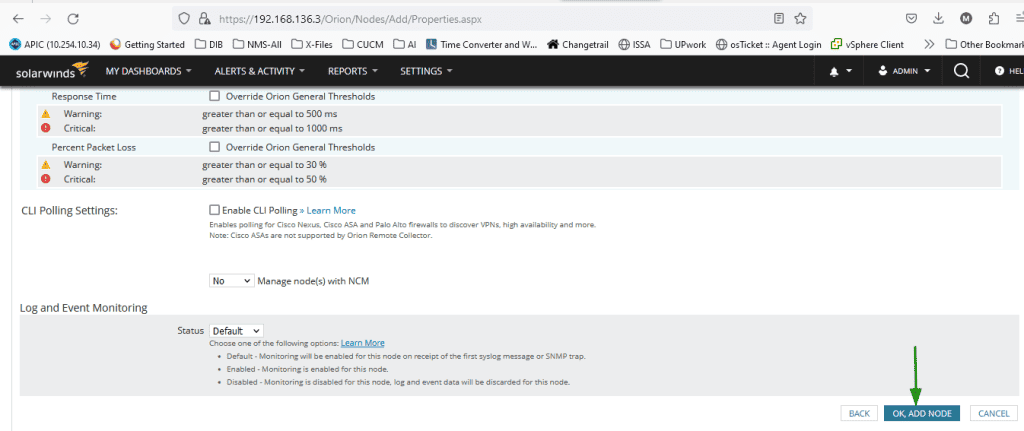
Finally, click on ‘OK, ADD NODE’.
Congrats, SNMPv3 has now been enabled on the device and we are successfully polling it from our NMS system. Cybersecurity should now be happy that there is one less device sending insecure SNMP messages on the network.


Excellent post. I have a Catalyst Center and Orion setup, where I have SNMPv3 with two different groups and users for each NMS configured on Cisco iOS Xe switches. However, I have the problem that when I synchronize the Catalyst Center, the node in Orion is alarmed. Until I enter the configuration commands again on the switch, it works, and the Catalyst Center is alarmed. It seems like I can’t report to both NMSs at the same time, even though they have different users and groups. Regards.