Cisco ISE 2.4 Active Directory Admin Login Configuration
If you’re working in an Active Directory environment you should consider using AD credentials for authenticating against Cisco ISE instead of locally stored credentials.
Not only are AD credentials more convenient to use, it’s also easier to track the activity of user’s within ISE when they are using their own credentials versus shared locally stored credentials.
The great thing about ISE is that, just like most networking equipment, it will fall back to the local credentials should AD be unavailable so the risk of locking yourself out of your Identity Services Engine is small.
Another nice thing about AD integration is you can use AD security groups for Role Based Access Control (RBAC) to ISE. Once you’ve set up the roles in ISE and created the AD groups it’s as simple as adding AD users to a security group when they’re hired and removing them from the AD group when they retire or change positions.
I personally try to make the least amount of configuration changes to ISE as possible once it’s working so offloading administrative tasks to AD is a great idea.
Related: Cisco ISE 2.4 Certificate Install
Preparing Cisco ISE 2.4 for Active Directory Authentication
There are a few things that you need to do before configuring ISE to use AD for logging into the admin interface.
First, we need to make sure the time within ISE is synchronized with the domain. I recommend using a centralized NTP server that both the AD Domain Controllers and ISE can poll time from.
Setting an NTP Server in Cisco ISE 2.4
When you first installed Cisco ISE you should have been prompted to set an NTP server and System Timezone via the CLI. If you only set the timezone and not the NTP server then we need to specify the NTP now.
- Navigate to Administration -> System -> Settings -> System Time and expand the NTP Server Configuration field.

- Enter your NTP server information in the NTP Server fields and click save.


Verifying DNS Settings in Cisco ISE 2.4
We also need to verify that DNS is set correctly. If ISE cannot resolve DNS with your domain name servers then joining your domain will fail.
- Open the console or an SSH session into your ISE appliance and run the command:
Show run | include name-server
- You should receive an output along the lines of:
ip name-server 10.6.0.2 10.6.0.3
Where 10.6.0.2 and 10.6.0.3 are the DNS servers you use for your domain.
If you do not have DNS servers listed or the incorrect servers are listed then you need to fix it.
- Within the console or SSH session into your ISE appliance run the command:
config
Where 10.6.0.2 and 10.6.0.3 are the DNS servers you use for your domain.
ip name-server 10.6.0.2 10.6.0.3
write memory
Joining Cisco ISE 2.4 to Active Directory Domain
Before we can use Active Directory to control authentication to ISE for admins we need to join ISE to the domain. If you followed my TACACS+ guide you’ve already completed this.
- Navigate to Administration -> External Identity Sources -> Active Directory and click on Add

- Enter your domain name in both the Join Point Name and Active Directory Domain boxes
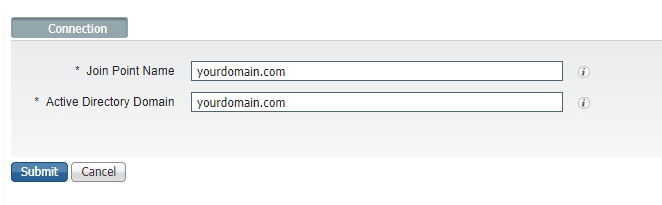


Join Point Name is essential a display name for your AD join. You can have multiple AD joins and the Join Point Name helps you tell them apart. In this setup we’re only using one domain so it doesn’t really matter.
- Click the Submit button
- Click Yes to join all ISE nodes to this Active Directory domain when prompted.


Here is another “it doesn’t really matter” situation since we are only configuring one ISE node in this setup.
- Enter the credentials you use when joining machines to your domain.


You could also check the box to specify the organizational unit you want the ISE object to end up in. In my setup I’m not going to do this. I have my directory configured to drop domain joins into a specific folder already. I’ll simply move the object in AD if I decide I want it somewhere else.
As for the “Store Credentials” box. You would use this if you wanted to save the credentials for joining other nodes. I don’t have any other nodes to join so I’m not going to check this box.
- Click OK.
You should now see the status of your Join Point change to Operational and list your domain controller.

Creating Security Groups to Control Access to Cisco ISE 2.4
The next thing we need to do to prepare for using AD to authenticate to Cisco ISE 2.4 is to create at least one security group in Active Directory to use for controlling access to ISE.
In my environment I’m just going to create one group for now that will allow super admin access to ISE in place of the local super admin account that was configured when ISE was installed.
- Create your desired group in AD and add the appropriate members.


Add Active Directory Groups to Cisco ISE 2.4
The last thing we need to do is add our newly created security group to ISE so we can select it later.
- Navigate to Administration -> Identity Management -> External Identity Sources -> Active Directory -> Groups

- Click Add -> Select Groups from Directory

- Search for the group you created and check the box in front of it.

- Click ok.


Set Cisco ISE 2.4 to Use AD for Admin Login Authentication
Now that we’ve prepared our environment we can begin configuring ISE to use AD for authenticating admins to the ISE admin page.
- Navigate to Administration -> System -> Admin Access -> Authentication Method and change Identity Source to AD:mydomain.com
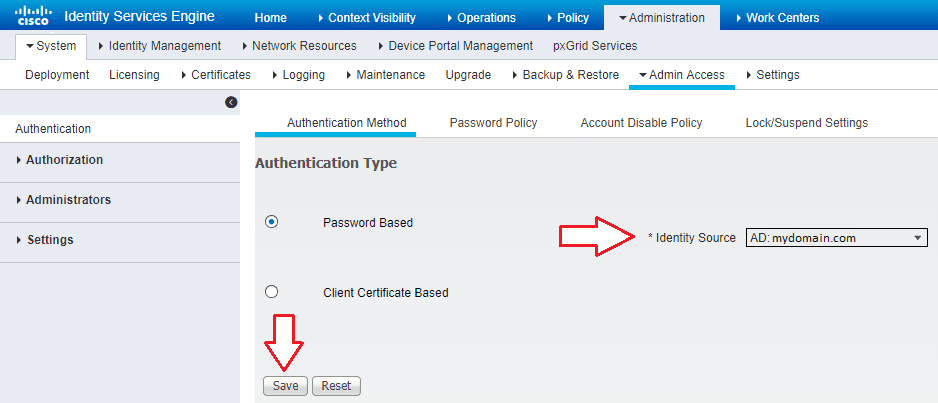

Don’t worry about setting this before configuring the rest of the ISE AD options. This setting just allows domain authentication as an option at the login screen. Local login will still be available.
- Navigate to Administration -> System -> Admin Access -> Administrators -> Admin Groups and click Add

- In the screen that opens enter a group name, check the External box, and then select the AD security group you added to ISE earlier. Click Submit.

- Navigate to Administration -> System -> Admin Access -> Authorization -> Policy and click the Actions drop down on one of the RBAC Policies (doesn’t matter which one, it’ll be inserted in alphabetical order after saving) and click Insert New Policy.
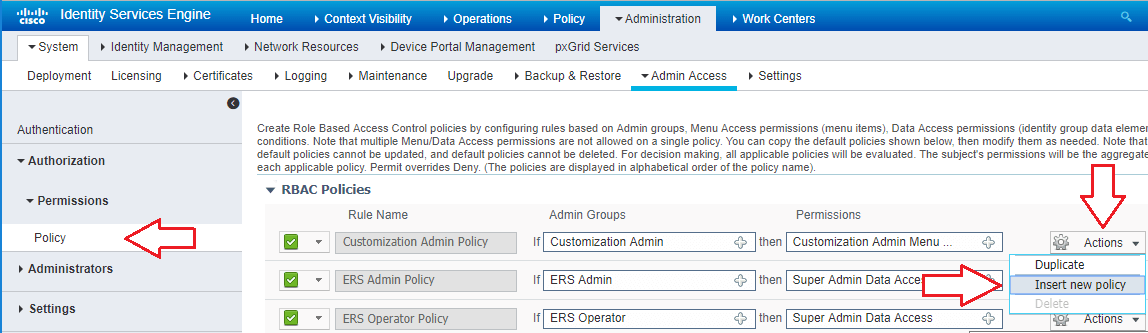
- Enter a Rule Name, add the group you created above to the Admin Groups filed, then add both the Menu Access and Data Access for your desired permission level (in my case Super Admin).

- Click Save.


Now you could have just duplicated the Super Admin Groups and RBAC policy instead of creating a new one but there were bugs in 2.3 that would cause weird permission issues if you did this. I don’t have full faith in that method because of that so I just create a new group. It’s not difficult and takes very little time anyway.
After about 1-2 minutes you should be able to log into your ISE server using your domain credentials.

Should you ever have troubling logging in using domain credentials you can click the drop down after your domain in the Identity Source screen and choose Internal. You can then sign in using the local admin account you created at install (provided you didn’t let the password expire)

I’m still having difficulty joining my ISE on VM to my DC on server 2012.
However, how did you configure your NTP server on your server.